Author: Aniruddh

  • Xiaomi Mi4 Cons and Pros Review

    Xiaomi Mi4 is the last year flagship model of the company. Almost a year later it is available for Indian customers. The previous models Xiaomi Mi3, Redme 1s got huge success. However, Redme Note not received the same response like the other. When Xiaomi launched Mi3 or Redme 1s, it was something great offering for that price. Now Xiaomi Mi4 has many competitors such as with same price tag and specification. We will see how is the performance of this device.

    Read:

    OnePlus One review

    Huawei Honor 6 Review

    Xiaomi Mi4 is powered by 2.5GHz Quad core Snapdragon 801 CPU with Adreno 330 GPU and 3GB of RAM. It comes with 16 or 64GB internal storage. Unfortunately there is no option to add additional storage through microSD card. Out of the box device runs on Android 4.4.4 Kitkat with MIUI 6 skin.

    Xiaomi Mi4 Review

    Xiaomi Redme Mi4 sports 5 inch IPS  capacitive touch screen with screen resolution of 1080*1920 pixels which results in pixel density of 441. The screen has Corning One glass Solution for protection against scratches. Connectivity features of the device includes 2G, 3G, 4G, WiFi, Bluetooth and USB. 4G of this device is not compatible with Indian 4G networks.

    Xiaomi Mi4 houses 13MP front facing camera which can record upto 4K resolution videos and 8MP front facing camera.  It has 3000 mAh battery. It does supports Qualcomm fast charging and the stock charger supports this feature as well.

    Advantages and disadvantages of Xiaomi Mi4

    Pros of Xiaomi Mi4

    • Brilliant display screen: The viewing angles and sunlight legibility is great.
    • Good camera performance:  Both primary 13MP and secondary 8MP camera performance is very impressive.
    • Excellent performance:  The performance of this device is excellent. The multitasking and gaming performance of Mi4 is exceptional and at par with other high end smartphones.
    • Great Battery Life: The battery life of Mi4 Coupled with fast charging feature, it  is much better than many other smartphone in the segment.
    • Great value for money

    Cons of Xiaomi Mi4

    • High SAR value: The SAR value of Xiaomi Mi4 is 1.360 W/Kg which is very high compared to other smartphones. If you are a health conscious, then you need to take this into consideration.
    • Color rendering of the screen is not accurate:  The colors in the display look vivid and great. However, colors doesn’t look natural even if we set Saturation level to Standard.
    • Indian 4G band is supported: Though it has 4G support, it is not compatible with Indian 4G bands.
    • No expandable storage: The device does support adding additional storage through microSD card.
    • No NFC: This is one features which was present in Mi3 and omitted in this model.
    • Average Speaker: The mono speaker of Mi4 does not provide loud output.

    Xiaomi Mi4 Specification

    • 2.5GHz Quad core Snapdragon 801 CPU with Adreno 330 GPU
    • 3GB of RAM and 16/64Gb internal storage
    • 5 inch IPS  capacitive touch screen with full HD resolution
    • 13 MP primary camera and 8MP front facing camera
    • 2G, 3G, 4G, WiFi, Bluetooth and USB
    •  3000 mAh battery.
    Xiaomi Mi4
    8 / 10 stars
  • Ulefone Be Pro Pros and Cons Review

    Ulefone Be Pro 5.5 is affordable Dual sim smartphone phablet with 4G capability. The large 5.5 inch screen with 720p resolution coupled with good performance makes this one of the best option to buy in this segment. The price of  Ulefone Be Pro 5.5 is $169.99. For all the readers of our blog, there is a special discount offer of $25 is available. For availing this, use the promotion code BePro if you are  buying this from gearbest.com.

    Ulefone Be Pro 5.5 is powered by 1.5GHz Quad core CPU which is based on 64-bit ARM cortex-A53 with MTK6732 chipset. It also comes with ARM Mali-T760 GPU @ 695MHz (400% more efficient than T604) based on cutting edge Midgard (3rd gen) architecture and 2GB of RAM.

    Ulefone Be Pro Android Phablet
    Ulefone Be Pro 5.5


    Ulefone Be Pro sports 5.5 inch IPS OGS capacitive touch screen with screen resolution of 1280×720 which results in a pixel density of 267 which is decent. The viewing angles, colour reproduction and sunlight legibility are acceptable. Only con of the display is it does not have the Corning Gorilla Glass protection. So you need to have a screen guard to prevent the screen from attracting scratches.

    Ulefone Be Pro houses 13MP Sony IMX with f/2.2 aperture primary camera with LED flash and autofocus. For Selfie lovers, there is a 8MP front facing camera which can also record videos at good resolution. Coming to storage, it has 16GB of internal storage and supports microSD card upto 64GB.

    Connectivity features of Ulefone Be Pro are 2G, 3G, 4G,WiFi and Bluetooth. This device also supports USB tethering and WiFi hotspots through which you can use Ulefone Be Pro as modem. The Dual sim Android phablet comes with 2600 mAh battery and runs on Android 4.4 Kitkat which will get Android 5.0 Lollipop update according the company.

    Advantages and Disadvantages of Ulefone Be Pro

    Pros of Ulefone Be Pro

    • Decent performance
    • Reasonably good camera performance
    • Good connectivity options
    • Good display screen

    Cons of Ulefone Be Pro

    • Out of the box, there is no Android 5.0.
    • Screen does not have the corning Gorilla Glass Protection.

    Ulefone Be Pro Specification

    • 1.5GHz Quad core CPU based on Mediatek chipset and 2GB RAM.
    • ARM Mali-T760 GPU
    • 5.5 inch IPS OGS capacitive touch screen with screen resolution of 1280×720
    • 13MP Primary camera and 8MP front facing camera
    • 2G, 3G, 4G,WiFi and Bluetooth
    • Dual sim and Android 4.4 Kitkat
    • 2600 mAh battery

    For all the readers of our blog, there is a special discount offer of $25 is available. For availing this, use the promotion code BePro.

  • How to Create Pie of Pie or Pie of Bar Charts in Excel

    The Pie charts well known for representing size relationship between the parts and entire thing. For example, if a company has multiple units, if you represent the profit of each unit in Pie Charts, it shows profit per unit in percentage. Sum of all slices/units is the total profit of the company.  Sometimes, we have the data where some slices are very tiny because of small values which something look like below image. In this scenario pie of Pie or Pie of Bar charts are useful.  Let us see how to use Pie of Pie charts in Excel.


    Pie-Chart-in-Excel
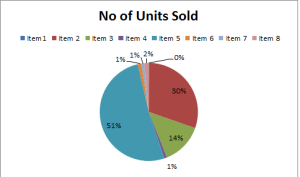
How to use Pie of Pie Charts in Excel

    Pie of Pie charts in Excel is used to represent separate  tiny slices from the main Pie chart and show them in additional Pie charts. Let us see how to Pie of Pie charts in Excel with an example.

    1: Select data for which you want to Draw Pie of Pie or Pie of Bar Chart.

    2: Go to Insert-> Pie and select Pie of Pie or Pie of Bar Chart.

    Sample data for Pie of Pie Chart

    3: You will get the chart as shown below. Now you can add the data labels to the charts which looks like below.

    How to customize Pie of Pie or Pie of Bar Chart

    4.By default, Pie of Pie charts in Excel takes some values. You can customize which type of values to moved to the additional chart. For this right click on the chart and choose Format Data Series from the menu.

    Sample Pie of Pie Charts in Excel


    5. In the Format Data Series dialog, click the drop down list beside Split Series to choose what you want to set the value you want to display in the second pie or bar. You can set Value or Percentage or Position. In this example, I have chosen the less than 10% percentage.  The position will be useful if you want to move a specific set of series to second pie.

  • Asus Zenfone C Cons and Pros Review

    The budget Dual sim Android market is becoming crowded. Even Asus launched smartphones under Zenfone series for the budget conscious market. Asus Zenfone C is one of them which got released recently. Does this worth buying? When we have so many options such as Xiaomi Redme 1S, Lenovo A6000, Moto E etc, where it stands? Let us have a look into it. Asus Zenfone C price in India is Rs.5,999.

    Asus Zenfone Dual sim

    Read: How to download Asus PC suite for Zenfones

    Asus Zenfone C is powered by 1.2GHz dual core Intel Atom Z2520 which is based on Intel’s previous generation Cloverview platform.  This is the same processor we have seen in the Zenfone 4.  It has 1GB of RAM and 8GB of internal storage. There is a provision for adding microSD card upto 64GB.

    Read: How to take screenshot on Asus Zenfone 

    Asus Zenfone C sports 4.5 inch screen with FWVGA 854×480 pixel resolution which results in 217 ppi pixel density. This display panel is not very good in the budget. Low screen resolution coupled with poor viewing angles, dull colours and harsh reflection puts this behind other same priced smartphones Moto E or Redme 1S.

    Asus Zenfone C comes with 5MP primary camera with LED flash. It record videos in HD resolution. But the video clarity is once again, below average. Photos taken are grainy and just dull. There is a also a VGA front facing camera. The connectivity features include 2G,3G, Wi-Fi b/g/n, Bluetooth 4.0. The device has 2100 mAh battery. Asus  bundled a app called Smart Saving which offers three modes namely Ultra-saving, Optimized, Customized mode.

    Advantages and Disadvantages of Asus Zenfone C

    Pros of Zenfone C

    • Reasonable performance: When it comes to performance in terms of casual games and day to day, it does decent job.
    • Good Build Quality: Overall, it comes with good build quality.
    • ZenUI: The customised ZenUI and Android 4.4 Kitkat provides good user experience.

    Cons of Zenfone C

    • Below average camera: Both primary camera and front facing camera are not impressive.
    • Poor Display panel: With poor viewing angles,Low screen resolution and  heavy reflections especially in outdoors, this is at par with competitors.
    • Average Battery: Even with Ultra saving mode, battery drains faster.

    Asus Zenfone C Specification

    • 1.2GHz dual core Intel Atom Z2520
    • 1GB of RAM and 8GB of internal storage
    • 4.5 inch display with FWVGA 854×480 pixel resolution
    • 5MP primary camera and VGA front facing camera
    • 2G,3G, Wi-Fi b/g/n, Bluetooth 4.0
    • 2100 mAh battery
  • How to use Lenovo A6000 as Modem

    Lenovo A6000 is one the most affordable 4G Dual sim Android smartphone in India. The good internal hardware coupled with decent build quality and competetive price is the key attraction of this smartphone. In this tutorial, we will see, how to use Lenovo A6000 as modem through WiFi hotspot and USB tethering.

    Read:

    Take screenshot on Lenovo A6000

    Lenovo A6000 Review

    How to download Lenovo A6000 PC Suite

    How to use Lenovo A6000 as WiFi Hotspot

    As I mentioned earlier, Lenovo A6000 supports 4G speeds. So even if you are outside, you can get the broadband speed on your smartphone. It is worth to use Lenovo A6000 as WiFi hotspot to connect to internet from your laptop or PC. Do remember that, using WiFi hotspot will incur charges as per your data plan also it will drain your device battery faster. Let us have a look into how to use Lenovo A6000 as WiFi hotspot.

    1. Enable the mobile data.
    2. Now go to settings->More…
    3. Tap on to Tethering & hotspot.
    4. Now enable the WLAN hotspot moving the slider to right.
    5. It will enable your Lenovo A6000 as WiFi hotspot.

    How to customise Lenovo A6000 WiFi hotspot Settings.

    If you want to customise the settings such as SSID, password and security type, follow the step given below. Even if you wanto see the Lenovo A6000 hotspot password or just want to change or reset Wi-Fi hotspot password of Lenovo A6000 and A6000 Plus, follow the step given below.

    • Tap on to WLAN hotspot
    • Now go to Set up WLAN hotspot.
    • You enter or edit the SSID, password and security type in this page.
    • Once you are done, tap Save.

    How to use Lenovo A6000 as modem through USB tethering

    1. Follow the same steps mentioned above till the step 3.
    2. Now connect your device to PC or laptop using the USB cable.
    3. Now enable the USB tethering.
    4. Now mobile data will be shared to your PC.

    Video Guide on How to use Lenovo A6000 as WiFi Hotspot