Author: Aniruddh

  • Samsung Galaxy S8 Launched in India-Top 5 Features

    Couple of days back, Samsung has launched much anticipated its flagship smartphones Galaxy S8 and Galaxy S8 Plus in India. With all new design and large display screen, there are many more features which makes it one of the strong contender for best flagship smartphone of the year 2017. Here are Samsung Galaxy S8 top 5 features according to us.

    You may like to read:

    How to clear cache in Galaxy S8

    Samsung Galaxy S8

    Samsung Galaxy S8 Top 5 features

    1.Design of Samsung Galaxy S8

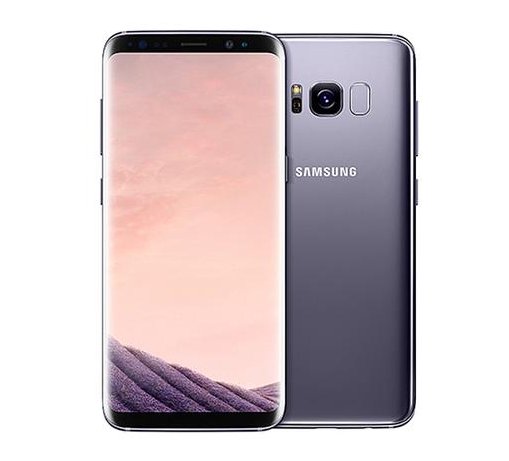
    Biggest change in the Galaxy S8 and Galaxy S8 Plus is it is design. Samsung Galaxy smartphone signature Home button is no longer exists. Fingerprint scanner is moved to the backside of the device. Bezels around the display reduced to accommodate large screen in compact form factor. The front and back is made up glass which has Corning Gorilla Glass 5 for protection. All these makes Galaxy S8 and Galaxy S8 Plus standout from the other smartphone.

    2. Infinity Display Screen

    Samsung Galaxy S8 comes with 5.7 inch and Galaxy S8 Plus has 6.2 inch screen. Both smartphones has resolution of Quad HD+(1440×2960) pixels. High Dynamic Range(HDR) and Snap Window features and aspect ratio of 18.5:9 looks impressive.

    3.Samsung DeX

    Both Samsung Galaxy S8 and Galaxy S8 Plus comes with a optional accessory called Samsung DeX. It is a mobile to PC transition tool which can turn the device into Android based desktop when connected to a monitor.

    4.Dual Pixel technology Camera

    Samsung Galaxy S7 is considered as one of the best camera smartphone. Galaxy S8 and Galaxy S8 Plus with new optics, said to improve further. The front facing camera with facial recognition technology which recognise and track faces to provide focussed selfies.  The new camera app provides wide variety of filters, animated stcikers and stamps.

    5. Performance

    US variant of Galaxy S8 and Galaxy S8 plus comes with Snapdragon 835 SoC(2.35GHz quad-core + 1.7GHz quad-core). The smartphones launched in India are powered by Exynos 8895 SoC with an octa-core processor (2.35GHz quad-core + 1.9GHz quad-core). These 10nm processors is said to be Gigabit LTE and Gigabit Wi-Fi ready with support for download speeds up to 1Gbps.

    These are top 5 features of Samsung Galaxy S8  according to us. There are many more features such as Dual sim support, Samsung pay, Bixby(Virtual Assistance) etc. It comes preloaded with Google assistance as well. We will be making a detailed review on Galaxy S8 in the coming days to know the practical aspects of these features.

  • How to take screenshot on OnePlus 3 and OnePlus 3T

    OnePlus 3 and OnePlus 3T runs on near stock Android Nougat with few useful customisation options. Taking screenshot on these devices are simple and easy. In this post, let us have quick look into how to take screenshot on OnePlus 3 and OnePlus 3T.

    Recommended Reading:

    How to set custom ringtones in OnePlus 3 and 3T

    How to take screenshot in OnePlus 7 and OnePlus 7 Pro

    How to transfer data from OnePlus 3 or OnePlus 3T to OnePlus 7 or OnePlus 7 Pro

    How to take screenshot on OnePlus 3 and OnePlus 3T

    There are two easy ways to take screenshot on OnePlus 3 and OnePlus 3T. First method is using the hardware buttons and second method is using 3 finger swipe method.

    Method 1: Taking screenshot on OnePlus 3 and OnePlus 3T using hardware keys

    This is the default way of capturing screenshot on many Android smartphones.

    • Go to the screen on which you want to capture screenshot.
    • Now press and hold Power and Volume Down buttons simultaneously.
    • Screenshot will be captured.

    Method 2: Taking screenshot using 3 finger swipe gesture

    To take screenshot using this method, follow the steps given below.

    How to take screenshot in OnePlus 3 and OnePlus 3T
    • First go to settings->Gestures.
    • Enable “Three-finger screenshot” by sliding the slider to the right.
    • Go to the screen on which you want to capture the screenshot.
    • Now, using three finger swipe down on the screen.
    • Screenshot will be captured.

    Taken screenshot using any of the above methods can be accessed from the Gallery app.

    Note:

    1. After Android 7 Nougat update, long screenshot option is not available. It may come back with future updates.
    2. Capturing screenshot by long pressing power button is discontinued in OnePlus 3 and OnePlus 3T.

    If you have any query on How to take screenshot on OnePlus 3 and OnePlus 3T, please share it in the comment section below.

    Video guide on how to take screenshot on OnePlus

  • Xiaomi Redmi Note 4 Vs Moto G5 Plus Which one is better

    Having more options to choose a smartphone is better for the consumer. However, there will be a problem with that as well. Which one to choose? which provides better value for money?. Moto G5 Plus and Redmi Note 4 are the two phones which share many similarities and few differences. Price, camera and battery life are the key differences between them. Performance, design and build quality looks similar at least on paper. This Xiaomi Redmi Note 4 Vs Moto G5 Plus comparison may help you to decide on which one to choose between these two smartphones.

    Xiaomi Redmi Note 4 Vs Moto G5 Plus

    Recommended Reading:

    https:/moto-g5-plus-faq-tips-tricks-cons/

    Redmi Note 4 Cons

    Xiaomi Redmi Note 4 Vs Moto G5 Plus Which one is better

    Design and Build quality

    • Xiaomi Redmi Note 4: It measures 151.00 x 76.00 x 8.30 and weighs ~175 grams.
    • Moto G5 Plus:It measures 150.20 x 74.00 x 9.70 and weighs ~155 grams.

    Both smartphones feature unibody all metal design. Moto G5 Plus slightly smaller and lightweight compared to Redmi Note 4.

    Display

    • Xiaomi Redmi Note 4: 5.5 inch full HD IPS screen with pixel density of 401.
    • Moto G5 Plus: 5.2 inch full HD IPS screen with pixel density of 424.

    Moto G5 Plus has smaller screen size compared to Redmi Note 4 which results in slightly higher pixel density. However, difference in real time is negligible.

    SoC, RAM and OS

    • Xiaomi Redmi Note 4: 2GHz Snapdragon 625 Soc with 2GB/3GB/4GB RAM variants. Runs on MIUI 8 on top of Android Marshmallow(6.0).
    • Moto G5 Plus: 2GHz Snapdragon 625 Soc with 3GB/4GB RAM variants. Runs on Android 7.0.

    If you just look into the specification, raw power between the two there is no difference. However as Redmi Note 4 runs on MIUI, it is little heavy which consumes more RAM compared to near stock Android on Moto G5 Plus. Running on latest Android version is another advantage Moto G5 has. Gaming and general performance on both device are good.

    Storage

    • Xiaomi Redmi Note 4:32GB/64GB
    • Moto G5 Plus:16GB/32GB

    The base variant of Redmi Note 4 comes with 32GB of internal storage where as top end variant which is priced at Rs.12,999 comes with 64GB of internal storage.

    Moto G5 Plus comes with 16GB for the base variant and top end variant comes with 32GB which is priced at Rs.16,999.

    Camera

    • Xiaomi Redmi Note 4:13MP primary camera and 5MP front facing camera.
    • Moto G5 Plus:12MP primary camera and 5MP front facing camera.

    In our testing, in well lit conditions, both device performed really well. However, in low light and artificial light conditions, Moto G5 Plus performance is way better than Redmi Note 4.

    Battery

    • Xiaomi Redmi Note 4: 4100 mAh battery.
    • Moto G5 Plus: 3000 mAh battery.

    Redmi Note 4 battery life is better than Moto G5 Plus. In our testing, it easily lasted more than 1 and half days compared to 1 full day usage of Moto G5 Plus.

    Price and Availability

    • Xiaomi Redmi Note 4: Rs.9,999 for the 2GB RAM variant, Rs.10,999 for the 3GB RAM variant and Rs.12,999 for the 4GB RAM variant.
    • Moto G5 Plus: Rs. 14,999 for the 3GB RAM variant and Rs.16,999 for the 4GB RAM variant.

    Xiaomi Redmi 4 is available through flash sales and Moto G5 Plus is available via open sale.

    Xiaomi Redmi Note 4 Vs Moto G5 Plus comparison summary

    Here is our summary of this comparison.

    Advantages of Xiaomi Redmi 4 over Moto G5 Plus.

    • Larger screen size.
    • Better battery life.
    • Higher internal storage option.
    • Price.

    Advantages of Moto G5 Plus over Redmi Note 4

    • Good camera performance.
    • Android Nougat out of the box.
    • Near Stock Android experience.
    • Dedicated microSD card slot.
  • How to set Custom ringtone in Moto G5 and Moto G5 Plus

    Changing the default ringtone and adding custom ringtone to a smartphone is something most of the user prefer to do after purchasing new smartphone. In this post, we will learn on how to set Custom ringtone in Moto G5 and Moto G5 Plus.

    Recommended Reading:

    Moto G5 Plus FAQ

    Moto G5 and Moto G5 runs on near stock Android 7.0 Nougat. The UI is identical and method to add custom ringtone to Moto G5 and Moto G5 Plus are also almost identical. There are several ways to add ringtone and notifications. Here is the two different ways  to set custom ringtone in Moto G5 and Moto G5 Plus.

    Ringtone in Moto G5 and Moto G5 Plus

    How to set Custom ringtone in Moto G5 and Moto G5 Plus

    Adding ringtones to Moto G5 and Moto G5 Plus without installing any apps

    To set a custom ringtone on Moto G5, you need to first paste the desired ringtone/notification tone to ringtones folder. You can do that by either connecting the phone to PC or using the pre installed file manager.

    Transferring the file through PC

    • Connect the phone to PC through the USB cable.
    • Enable file transfer in the device.
    • Now from PC/Laptop, paste the ringtone to the folder device > Internal Storage > Ringtones.

    Transfer the file through the pre installed file manager

    • Open file manager.
    • Browse the folder which contains ringtone.
    • Copy and paste it into the ringtones folder.

    Video Guide on set ringtone using the pre installed file manager

    This video is done on Moto G4 Plus. However, this is the same method in Moto G5 and Moto G5 Plus as well.

    Set ringtone in Moto G5 and Moto G5 Plus

    • Go to “Settings”->”Sound&notification”->”Phone Ringtone”.
    • Select the ringtone you want to use.

    Set ringtone in Moto G5 and Moto G5 Plus using ES file manager

    If you find any difficulty in following above steps, here is the easy way to set custom ringtone/notification in Moto G5 or Moto G5 Plus. For this follow the step given below.

    • Download and Install “ES File Explorer” from Google Play store.
    • Now Go to “Settings”->”Sound&notification”->”Phone Ringtone”.
    • You will get the browse option. Using that, select the tone which you want set as ringtone.

    Hope this method on how to set custom ringtone in Moto G5 and Moto G5 Plus helps. If you find any  difficulties in this, mention in the comment section below.

  • Asus Zenfone 3 Laser Review- Pros and Cons

    Asus Zenfone 3 series smartphone are aesthetically great looking smartphones. Zenfone 3 laser is no exception to it. Main USP of the device is its camera with laser autofocus mechanism which is claim to provide good image quality. Here is our  Asus Zenfone 3 Laser Review based on Pros and Cons.

    Asus Zenfone 3 Laser Review

    Recommended Reading

    Asus Zenfone 3 Laser FAQ

    How to take screenshot on Zenfone 3.

    Asus Zenfone 3 Laser has good design and build quality. The all metal unibody design coupled with thin bezels gives a premium feel to the device. There is no textured or fancy design elements in the back. It gives it a clean look and feel. In the same time, it is little slippery as well. So it is better to use backcover with this device.

    5.5 inch full HD display screen on Zenfone 3 laser is decent. It provides good viewing angle, contrast and colour saturation. The brightness is sufficient in most of the scenarios. In bright sunlight, as the screen is bit reflective, visibility is not great.

    Asus Zenfone 3 Laser is powered by Snapdragon 430 SoC with 4GB of RAM and Adreno 505 GPU. Out of the box device runs on Android Marshmallow 6.0.1 and ZenUI 3.0 on top of it. In general usage as well as in gaming we have not faced any issues.  It does provides option to remove some of the preinstalled apps.

    Camera is one of the much talked feature of the device. It sports 13MP primary camera on the rear and 8MP front facing camera. The camera UI has many useful modes such as Auto, ZenFlash, Manual, HDR Pro, Beautification, Super Resolution, Children, Low Light, QR Codes, Close-up etc. There is manual mode as well. In our testing, camera performance was decent.

    Zenfone 3 Laser houses 3000 mAh battery. In our usage, it lasted for full working day. The connectivity features of the device include 4G, VoLTE, WiFi, Bluetooth. The call quality and signal reception was excellent.

    Advantages and Disadvantages of Asus Zenfone 3 Laser

    Pros of Zenfone 3 Laser

    • Good design and build quality.
    • Decent camera performance.
    • Highly customisable UI.
    • Decent Display panel.

    Cons of Zenfone 3 Laser

    • Hybrid sim card slot.
    • No USB-C port.
    • Bit overpriced.