Category: Zenfone Tips

Asus Zenfone tips and tricks.

  • How to take screenshot on Asus Zenfone 3

    This year Asus has launched multiple variants of Zenfone 3. This includes Zenfone 3 Deluxe, Zenfone 3 Laser and Zenfone 3 Ultra to name few. In this post we will learn on how to take screenshot on Asus Zenfone 3.

    How to take screenshot on Asus Zenfone 3

    Recommended Reading:

    Asus Zenfone 3 FAQ

    How to take screenshot on Asus Zenfone 3

    There are multiple ways through which you can capture screenshot in Zenfone 3.  Here are the simple ways to perform print screen on this device.

    1st Method: Using the hardware keys

    This is the most common way of capturing screenshot on any Android smartphone which works on this device as well.

    • Go to the screen on which you want to take screenshot.
    • Press and hold volume down and power button simultaneously.
    • The screenshot will be captured.

    2nd Method: Taking screenshot on Zenfone 3 using screenshot button

    For capturing screenshot using this method, you need to customise on the quick settings option. This is one time settings.

    • Go to quick setting options which you can access by swiping down on home screen.
    • Now tap on to edit(2nd icon from top right).
    • Under “Select tools to show on quick settings panel”, enable “screenshot”.
    • As you can select only 4 tools, you might need to disable any of one of the currently showing tool.
    • Now whenever you want to take screenshot, go to quick settings panel and tap on to screenshot button. The screenshot will be captured.

    3rd Method: Taking screenshot on Zenfone 3 using recent apps button

    To take screenshot on Asus Zenfone 3 using this method, follow the steps given below.

    • Go to settings->”Asus customised settings”.
    • Tap on to Recent apps key.
    • Select “Tap and hold to take screenshot”.
    • Now whenever you want to take screenshot, tap and hold recent apps key. It will take the screenshot.

    How to set screenshot file format in Asus Zenfone 3 and where the screenshot will be saved?

    • To set the file format of taken screenshot, go to Settings->Screenshot option.
    • Tap on to Screenshot file format. You have the option of selecting JPEG or PNG.

    The taken screenshot will be saved in the gallery folder.

    If you find any difficulty in following this post on How to take screenshot on Asus Zenfone 3, please share it in the comment section below.

  • How to type Indian regional languages in Asus Zenfone Max

    Typing Indian languages such as Kannada, Hindi, telugu, tamil, Bengali, Malayalam etc in Zenfone Max is very easy. Now, there is no requirement of any external  app. Here is the step by step guide on how to type Indian languages in Zenfone Max.

    How to type Indian regional languages in Asus Zenfone Max

    As mentioned before, for typing indian languages such as Kannada, Hindi, telugu, tamil, Bengali etc, first you need to enable the respective languages in the settings.

    • Go to ‘Settings’->’Language & input’

    Type Indian Language

    • Tap on to ‘ZenUI Keyboard’

    Type Indian Language

      • Now tap on to “Input languages’.

    Type Indian Language

    • In this page, you have list of input languages already available in the device.
    • Find and select the input language by check marking.

    Adding Input languages

    If the input language which you are looking for is not available in the list, then you need to add that language.  For that,

    • Tap on to Plus symbol(+) in the top of the screen.

    Type Indian Language

    • You will find many more languages.
    • Select the language which you want to download.
    • Once downloaded, you can select it in previous page as mentioned before.

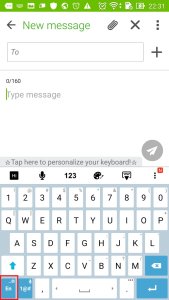
    How to shift between languages while typing in Zenfone Max

    Shift between Languages

    Whenever, you want to type language in messages, whatsapp messages etc, tap on to ‘En…” button. It will change the languages.

    Video on how to type Indian Languages in Zenfone Max

    I have made video on demonstrating how to type Indian languages in Asus Zenfone Max.

  • How to Use Asus Zenfone 2 As modem to Connect to Internet from PC

    Asus Zenfone 2 is one of the popular android smartphone. Good performance, Good camera, ZenUI with great customizability features and affordable price attracts people to buy this smartphone. Asus has launched different variants under  Zenfone 2 series such as  Zenfone Laser, Zenfone Selfie, Zenfone 2 Deluxe etc. These smartphones support fast 4G LTE connectivity. So is any way to share Zenfone mobile data with PC, Laptop, iPad, tablet?. Yes. the current Android smartphones does allow this feature by default. So here is the guide on how to use Asus Zenfone 2 as modem to share mobile internet to PC, Laptop, iPad, tablet etc.

    Recommended reading:

    How to take screenshot on Asus Zenfone 2

    How to Use Asus Zenfone 2 As modem to Connect to Internet from PC

    For using Asus Zenfone 2 as modem, based on the requirement, there are three different methods are available. WiFi hotspot method, USB tethering and Bluetooth Tethering. Do note that, using any of this method will consume your mobile data. So make sure you have good mobile data plan enabled from your mobile network provider. The data charges applies as per your network provider. Let’s start one by one methods. For using all this method, first enable mobile data and then follow the steps.

    Asus Zenfone 2 As WiFi Hotspot to Connect to Internet from PC, Laptop, iPad, tablet with WiFi reception capability

    This is most popular and very useful method of sharing mobile data with other WiFi enabled devices. To use Asus Zenfone 2 as WiFi Hotspot, follow the steps given below.

    • Go to “Settings”-> “More”-> ” Tethering and Wifi hotspot “-> ” Set up Wi-Fi hotspot “.
    • Enable WiFi hotspot by tap on the checkbox. Your Zenfone 2 will start sharting the mobile data via WiFi.
    • To customise the WiFi hotspot settings, go to ” Settings ” -> ” More ” -> ” Tethering and Wifi hotspot ” -> ” Set up Wi-Fi hotspot “.
    • In this page you can name your WiFi network SSID, password and Security type. Once done, tap on to “Save”.
    • Now you can access your Zenfone 2 WiFi hotspot from any WiFi enabled devices by entering the SSID and password you have chosen.

    Below is the video Guide on how to use Zenfone as WiFi hotspot.

    How to Use Asus Zenfone 2 as modem through USB Tethering

    Asus Zenfone 2 USB Tethering is the method used to share mobile to data to PC through USB.

    • First connect your Zenfone 2 to PC via USB cable. You might need Asus Zenfone PC suite for install drivers.
    • then Go to “Settings”-> “More”-> ” Tethering and Wifi hotspot “.
    • Enable “USB tethering”.
    • Your Zenfone 2 will start sharing the mobile data to your PC.

    How to Asus Zenfone 2 as modem through Bluetooth Tethering

    Asus Zenfone 2 Bluetooth Tethering is the method used to share mobile internet to PC through Bluetooth. For using this method, you need to configure your PC as well.

    • Enable Bluetooth on your Zenfone 2.
    • Now go to “Settings”-> “More”-> ” Tethering and Wifi hotspot “.
    • Enable “Bluetooth Tethering”.
    • Make your Zenfone visible visible to all nearby Bluetooth devices.

    Now you need to pair it with your laptop to connect to internet using Zenfone 2 Mobile data. This is a one time activity on your laptop.

    • On your laptop, go to Control Panel-> Devices and Printers.
    • Click on Add a device. It will show all available devices.
    • Select Zenfone and click “Next”.
    • Make sure the pairing codes are consistent in ZenFone and Laptop then click on Pair.
    • You will get a confirmation that, Zenfone is successfully added to your laptop.
    • Now once again go to Control Panel-> Devices and Printers.
    • Right click the ZenFone icon.
    • Select “Connect using”.
    • Select “Access point”.
    • Now Bluetooth Tethering is enabled.
  • How to Take Screenshot on Asus Zenfone 2 Laser

    Asus Zenfone 2 Laser is most affordable smartphone under Zenfone 2 series. It has decent specification and competetive price tag. The laser focussed camera is the key attraction of this smartphone. In this post we will learn how to take screenshot on Asus Zenfone 2 Laser. The device runs on Android Lollipop with ZenUI. The ZenUI provide lot of customisation which enhances the user experience. It also includes many features which are very useful. For performing print screen on Zenfone 2 Laser,  there are 3 methods. You can choose any of these screen capture methods.

    Asus Zenfone Laser

    Recommended reading:

    Asus Zenfone 2 Laser Review

    How to take screenshot on Asus Zenfone 2

    How to use Asus Zenfone 2 Laser as Modem or Tethering

    How to Take screenshot on Asus Zenfone 2 Laser

    There are two variants of Asus Zenfone 2 Laser. Both variants support below mentioned ways of capture screen methods.

    Method 1: Default Android method

    It is the most common and widely used method of taking screenshot on any Android smartphone. For this you need to press and hold volume down key and power button simultaneously for few seconds. The screenshot is captured. You can access the taken screenshot from Gallery.

    Method 2: Using Recent apps key

    For taking screenshot on Asus Zenfone 2 Laser using this method, follow the steps given below.

    • First go to the “Settings”. Under settings, you will find “Asus ASUS customised settings” . Tap on to it.
    • In this, choose the ‘Recent apps key’.
    • Under Recent apps key settings, you will find “Tap and hold to capture screen”. Choose that.
    • Now, whenever, you want to take screenshot on any page, just tap and hold recent apps key to take the screenshot.

    Method 3: Take screenshot on Asus Zenfone 2 Laser using Quick Settings

    For enabling this method, you need to customise the Quick Settings menu in Zenfone 2 Laser. For that, follow the steps given below.

    • Go to Quick Settings page by swiping down the screen from top.
    • Tap on edit quick settings icon.
    • In the quick setting option, the top row provides only 4 tools. So you need to disable one app appearing in the top row and choose, screenshot.
    • Tap on to save.
    • Now when you need to take screenshot, go to quick setting menu, you will find screenshot option. Tap on to it to take the screenshot.

    Hope this tutorial on How to Take Screenshot on Asus Zenfone 2 Laser is useful. If you are facing any issues while following the instruction, please share it in the comment section below.

  • How to Download Asus Zenfone PC Suite

    Asus Zenfones feature rich Android smartphones powered by Intel Atom Processor with Hyper-Threading Technology. Currently there 3 major versions of Zenfones are available-Zenfone4, Zenfone 5 and Zenfone 6.  The smartphones comes ZenUI. Asus provides Free PC suite for Zenfones in the name of PC Link.

    Asus Zenfone PC Link
    Asus PC Link

    Asus Zenfone PC suite PC Link helps you to access the device from the convenient of PC. For example you can send SMS from PC using the keyboard and mouse. Similarly, Zenfone PC suite allows you do most of the tasks from the PC. It is also useful installing the required drivers for Zenfones. Let us learn how to download Asus Zenfone PC suite PC Link.

    Read:

    How to take screenshot on Asus Zenfone.

    How to take screenshot On Asus Zenfone 2

    How to Download Asus PC suite PC Link

    Follow the steps below to download and install the Zenfone PC suite.

    • You can download Asus Zenfone PC suite directly from the official support page here.
    • Follow the on screen instruction to complete the installation.
    • Once installed, the Asus PC Link PC suite shortcut will appear in the desktop

    Before opening the Asus Zefone PC Link PC suite for the first time, you need to configure the PC link in your Zenfone.

    • Launch the Asus PC Link on your Zenfone.
    • New Dialogue box will appear if “USB debugging” is not enabled. Tap on Ok.
    • You will redirected to the Developer Options page. Check “USB  debugging” and tap Ok.
    • Read the instruction and tap on to “Done”.
    • Connect your Asus Zenfone to PC using the USB cable. Select “Always allow from this Computer” option if you want and tap Ok.

    Connecting Asus Zenfone with PC using the PC link PC suite

    Whenever, you want mirror your Zenfone and control your Asus Zenfone from your PC with mouse and keyboard follow the steps given below.

    • Connect the Asus Zenfone to PC through USB cable.
    • Start Asus PC Link app on your device.
    • Start the Asus PC Link Windows application on your computer.
    • Click “Connect” Button to establish connection.
    • Press Ok button on your Asus Android smartphone when the input method dialogue is popped-up.
    • Now you can control your Asus Zenfone by operating ASUS PC Link Windows application.

    Now you can access and use your Asus Zenfone from the PC using Asus PC Suite. This methods works for all the Asus Zenfone. This guides provides solution on

    How to download Asus Zenfone 4 PC Suite

    How to download Asus Zenfone 5 PC Suite

    and

    How to download Asus Zenfone 6 PC Suite.

    If you are facing any difficulties on following these steps and facing any errors, please share it in the comment section below.