Category: Samsung

News, tips and tricks and Reviews on various Samsung Smartphones.

  • Samsung Galaxy S24 Ultra: How to screenshot

    Samsung Galaxy S24 Ultra provides multiple ways to take screenshot. This includes using Edge pane, two button combination, Palm swipe gesture and quick panel. So lets explore how to take screenshot on Samsung Galaxy S24 Ultra using these methods.

    How to take screenshot on Samsung Galaxy S24 Ultra

    Edge Panel Method:

    To take a screenshot on your device, there are a couple of methods you can use. One of them is by using the Edge panel.

    Here’s how to do it:

    • Pull the Edge Panel handle to access different panels.
    • Swipe through the boards until you reach the tasks page.
    • On the tasks page, you’ll find a “Take screenshot” button.
    • Tap on it to capture the screenshot.
    • The screenshot will be saved automatically.

    If you don’t have the tasks page on your Edge panel, you can easily add it by following these steps:

    • Go to Settings.
    • Select Display.
    • Scroll down until you find Edge Panel. Tap on it and make sure it’s on.
    • Next, tap on Panels and select “Tasks” from the available panels.
    • You’ll see a checkmark on top of it. In the future, whenever you want to capture the screen, simply open the Edge panel, navigate to the tasks page, and tap on “Take screenshot.” You’ll see a toolbar that gives you options to edit, tag, or share the screenshot.

    Palm Swipe Gesture Method

    To take a screenshot on your Galaxy S24 Ultra, you can use the palm swipe gesture.

    To do this, simply swipe your palm across the screen in either direction – right to left or left to right – while bending your hand and keeping the edge of your palm close to the screen. This will save the screenshot. If you find that this method is not working, you can check if the gesture is enabled in your phone’s settings. To do this, go to Settings, scroll down and select “Advanced Features”, then tap on “Motions and Gestures” and make sure that “Palm Swipe to Capture” is turned on. If you have a screen protector on your phone, you may need to enable “Touch Sensitivity” in the Display section of your phone’s settings to use this gesture. Once you have enabled these settings, you will be able to take a screenshot using the palm swipe gesture.

    If you find that this method is not working, you can check if the gesture is enabled in your phone’s settings. To do this,

    • Go to Settings->Advanced Features->Motions and Gestures.
    • Make sure “Palm Swipe to Capture” is turned on.
    • If you have a screen protector on your phone, you may need to enable “Touch Sensitivity” in the Display section of your phone’s settings to use this gesture. Once you have enabled these settings, you will be able to take a screenshot using the palm swipe gesture.

    Two-button combination method

    If you wish to take a screenshot of your phone screen, you can use a combination of two buttons which is a good option for capturing the lock screen. However, you can use this method on any page. The buttons you need to use are the Volume Down and Power buttons, which you can find on the right side of your device. To use this method, quickly press and release both buttons together. If you hold these two buttons, a power menu will appear instead of taking the screenshot. Therefore, it is important to press and release the keys quickly. The screenshot will be saved to your Gallery.

    Quick Panel Method

    To use this method,

    • Swipe down from the top of the home screen to open the Quick Panel.
    • Swipe down again to expand it.
    • Tap the pencil icon located at the top right corner of the screen.
    • Tap on “Edit” option.
    • In the bottom half of the screen, you’ll see all the available toggles. Look for “take screenshot”.
    • Press and hold on to it and drag it to the top active area. You can adjust the placement as per your convenience.
    • Tap “Done” to save it and you can close the interface. That’s it! You have successfully added the “take screenshot” toggle to your Quick Panel.
    • In the future, to take screenshot Galaxy S24 Ultra, go to the quick panel by swiping down twice on the screen. You will see take screenshot button. Tap on it to save the screenshot.

    Long or Scroll Screenshot

    First, go to the app or webpage that you want to capture. Next, take a screenshot using any of the methods you prefer. Once you’ve taken the screenshot, you’ll see a scroll screenshot button on the toolbar. Tap on it, and the page will start to scroll automatically while the screen is being captured. When you reach the end of the page, or if you stop tapping the button, the screenshot will be saved to your Gallery.
  • Samsung Galaxy S24 Ultra: Add or remove SIM cards

    Samsung Galaxy S24 Ultra comes with dual SIM card support. You can use two physical nano sim cards or 1 physical sim card and a eSIM. On the top you can add the 1st SIM card and on the back you can add the second SIM card.

    How to insert SIM cards into Samsung Galaxy S24 Ultra

    Here is the video guide on how to insert SIM cards into Galaxy S24 Ultra and configure preferred SIM for calls, messages and mobile data.

  • Samsung Galaxy S24 Ultra: How to Turn off

    Samsung Galaxy S24 Ultra is one of the best flagship available in the market now. If you own one and wondering how to turn off Samsung Galaxy S24 Ultra, here are two different methods.

    How to turn off Samsung Galaxy S24 Ultra and Restart

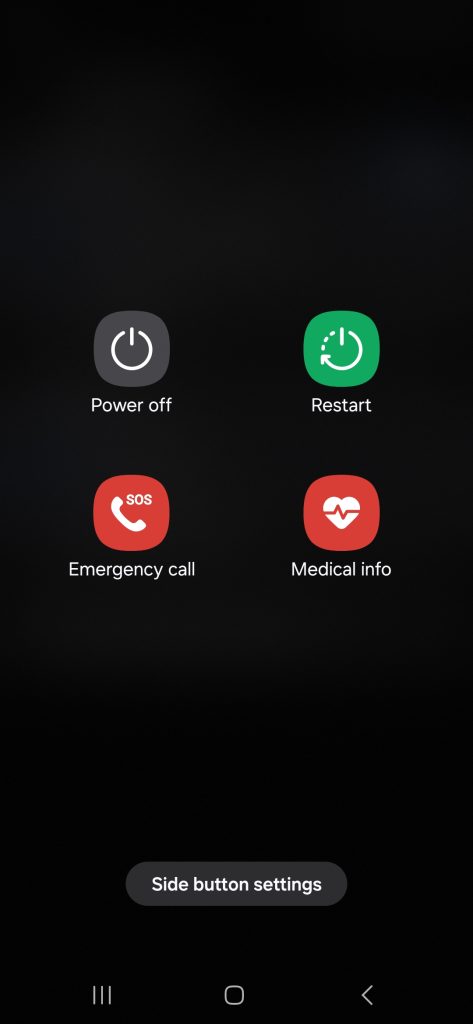
    If you press and hold the side button, you will get Bixby instead of Power menu. You can switch off your phone using the Bixby. But it is a not convenient way for many. So here are the different ways to power off Galaxy S24 Ultra.

    Method 1: Using Power menu

    To turn off your Galaxy S24 Ultra, press and hold both the Volume down and Side keys for a few seconds until you see a power menu. Alternatively, you can access this menu by swiping down twice on the screen to open the Quick Panel, and tapping on the power icon located on the top right side. From this menu, you can either turn off or restart your phone. If you choose to turn off your phone, tap on “Power off” and confirm your selection. Your phone will then shut down. To turn it back on, hold down the Side Key for a few seconds until you see the Samsung logo appear. Within a few seconds, you will get the lock screen and then upon unlocking you will get the home screen.

    Method 2: Power off Galaxy S24 Ultra by remapping the side button

    To remap the side button,

    • Go to Settings->Advanced Features-> Side button.
    • From the press and hold section, select “Power off menu”.
    • Thats it.

    In the future, whenever you long press on the side button your will get Power off menu. You can choose between Power off or restart.

    Method 3: Using the Bixby

    As mentioned before, you can use Bixby to do many tasks which includes shut down or restart. So use this method, launch Bixby by long pressing the side button. Now, give a voice command “Turn off my phone” or type it. Select Power off or reboot.

  • How to wipe cache partition on Samsung Galaxy Tab S9

    Clearing the cache partition may fix some of the issues on the Samsung Galaxy Tab S9, Galaxy Tab S9 Plus or Galaxy Tab S9 Ultra . Over the period of of time, system generated cache file increases and may impact the performance. It is considered to be safe as it will not remove any user data. So in this post, let us explore how to wipe cache partition on Samsung Galaxy Tab S9, Galaxy Tab S9 Plus and Galaxy Tab S9 Ultra.

    Though Clearing cache partition considered to be safe, it is recommended to have a backup of your phone before proceeding.

    How to wipe cache partition on Samsung Galaxy Tab S9 using android recovery mode

    To clear cache on Galaxy Tab S9 using this method, the first step is to get into Android recovery mode.

    Related post

    How to screenshot on Samsung Galaxy Tab S9

    Ways to turn off Samsung Galaxy Tab S9

    How to enter Android recovery mode on Galaxy Tab S9

    • First, Turn off your phone.
    • Once the phone is completely shut down, connect your tab with other Samsung phone or a computer using a USB cable.
    • Once you see the charging percentage on the screen, press and hold the Volume up and Side key together.
    • Samsung Logo followed by Samsung Galaxy appears on the screen. At this point, release the keys.
    • It will boot into the Android recovery mode.

    How to wipe cache partition on Samsung Galaxy Tab S9

    How to wipe cache partition on Samsung Galaxy Tab S9
    • Once you are in Android recovery mode on Galaxy Tab S9, you can navigate between the options using the Volume keys. So using the volume keys, navigate to Wipe Cache Partition.
    • Press the side key to select it.
    • Confirm your action by selecting Yes using the Volume key and then Side key.
    • At the bottom of the screen, you will get a message stating Cache Wipe complete.
    • Restart the phone by selecting Reboot system now and then Side key.
    • You can remove the USB cable now.
    • Phone will restart in the usual way.

    This way you can perform wipe cache partition on Samsung Galaxy Tab S9 using the Android recovery mode. If you have facing any issues, feel free to write them in the comment section below.

  • How to Disable Glance on Samsung Galaxy Phone

    If you have bought any Samsung Galaxy M series, Galaxy F Series or Galaxy A Series, you might have seen the ads on lock screen. These are called Glance on Samsung which is seen on Galaxy A34, Galaxy A54, Galaxy M34, Galaxy F34 etc. This consumes mobile data to download the auto changing wallpaper services. So, in this post, let us explore to how to disable Glance on Samsung Galaxy Phones.

    How to Disable Lock Screen Wallpaper services or Glance on Samsung Galaxy Phone

    To disable auto changing wallpapers or lock screen ads on Samsung Galaxy phones,

    • Go to Settings.
    • Scroll down and find Wallpaper and style. Once you get it, tap on it.
    • Now press Change wallpapers.
    • Next choose Wallpaper services.
    • Tap More button.
    • By default, Glance on Samsung will be selected. It means your phone lock screen will show ad-linked automatic changing wallpapers.
    • To remove lock screen wallpaper ads, Select None and toggle off the switch to disable Swipe left for the info page.
    • Save the settings by tapping Apply. This will disable glance in Samsung.

    This way, you can disable ads on Samsung Galaxy phone or lock screen ads.