Tag: Excel Tips

  • How to Round a Number to Closest ten in Excel

    Rounding a number in Excel is very easy. There are situation wherein we need to round a number to closest 10 or 100. For example, if we have a number 115 then 120, if we have 112 then 110. For this there is a dedicated function in Excel called MROUND which comes useful for such scenario. Let us learn more about the function MROUND in Excel.

    Syntax of Excel MROUND function

    MROUND(number, multiple)

    Where,

    • Number Required. The value to round.
    • Multiple Required. The multiple to which you want to round number.

    Note: MROUND rounds up, away from zero, if the remainder of dividing number by multiple is greater than or equal to half the value of multiple.

    Example:

    Below are the few useful examples of MROUND in Excel.

    1. Rounding a number to multiples of 10

    =MROUND(112, 10) Rounds 112 to the nearest multiple of 10 which will return 110

    =MROUND(116, 10) Rounds 116 to the nearest multiple of 10 which will return 120

    2. Rounding a number to multiples of 5

    =MROUND(112, 5) Rounds 112 to the nearest multiple of 5 which will return 110.

    =MROUND(116, 5) Rounds 116 to the nearest multiple of 5 which will return 115.

    =MROUND(118, 5) Rounds 118 to the nearest multiple of 5 which will return 120.

    There are other two Excel function which are very similar to this function but with slight change on the functionality.

    1. CEILING(number,significance)

    This will Returns number rounded up, away from zero, to the nearest multiple of significance. For example

    CEILING(112,5) will return 115

    CEILING(112,10) will return 120

    CEILING(115,5) will return 120.

    2.FLOOR(number,significance)

    This will Rounds number down, toward zero, to the nearest multiple of significance.  For example,

    FLOOR(112,5) will return 110

    CEILING(115,10) will return 110.

    So in summary, MROUND Excel function is useful when we need to round number up or down to the nearest multiple. Whereas if you want roundup decimals then ROUNDUP function is useful. For rounding down decimal ROUNDDOWN excel function is useful. Depending on the requirements, these Excel functions will help us to save our time.
  • How to Create Pie of Pie or Pie of Bar Charts in Excel

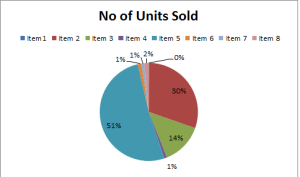
    The Pie charts well known for representing size relationship between the parts and entire thing. For example, if a company has multiple units, if you represent the profit of each unit in Pie Charts, it shows profit per unit in percentage. Sum of all slices/units is the total profit of the company.  Sometimes, we have the data where some slices are very tiny because of small values which something look like below image. In this scenario pie of Pie or Pie of Bar charts are useful.  Let us see how to use Pie of Pie charts in Excel.


    Pie-Chart-in-ExcelHow to use Pie of Pie Charts in Excel

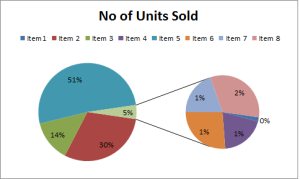
    Pie of Pie charts in Excel is used to represent separate  tiny slices from the main Pie chart and show them in additional Pie charts. Let us see how to Pie of Pie charts in Excel with an example.

    1: Select data for which you want to Draw Pie of Pie or Pie of Bar Chart.

    2: Go to Insert-> Pie and select Pie of Pie or Pie of Bar Chart.

    Sample data for Pie of Pie Chart

    3: You will get the chart as shown below. Now you can add the data labels to the charts which looks like below.

    How to customize Pie of Pie or Pie of Bar Chart

    4.By default, Pie of Pie charts in Excel takes some values. You can customize which type of values to moved to the additional chart. For this right click on the chart and choose Format Data Series from the menu.

    Sample Pie of Pie Charts in Excel


    5. In the Format Data Series dialog, click the drop down list beside Split Series to choose what you want to set the value you want to display in the second pie or bar. You can set Value or Percentage or Position. In this example, I have chosen the less than 10% percentage.  The position will be useful if you want to move a specific set of series to second pie.

  • Format Cell using EXCEL function

    In EXCEL, we can format the numbers into different formats using the Format option. In some instances, we need to format the cell value which is a result of another formula. In other output from EXCEL format should be in the desired format. There is a EXCEL function called TEXT. This is useful for this. In this post we will learn the way to format cell using a EXCEL function TEXT.

    Format Cell Values using EXCEL Function

    We can use TEXT excel function to Format Cell in Excel. This method is useful when we need to implement formatting inside a EXCEl formula.

    Syntax of Excel TEXT Function

    =TEXT(value, format_text)

    Where
    Value is the number which we want to change the format.
    format_text is the required format.

    Examples of converting the format of values in Excel using formula

    We have a value 41479 in cell A1.
    =TEXT(A1,”dd-mmm-yyyy”)
    The above formula changes the format of the value in cell A1 to dd-mmm-yyyy format(24-Jul-2013).

    Similarly you can use any format in which you want to display the number. Below are some more example for the same.

    • =TEXT(A1,”#,##0″) this will give output as 41,479.
    • =TEXT(A1,”£#,##0;-£#,##0″) which gives output in the format £41,479.

    Like this you can use your own formatting using this excel formula. The biggest advantage of this excel function is that you can use this formula inside another formula or function to format the output.

    For example you want to concatenate date and a text . In Cell A1 we have “Today Date is” and in cell B1 we have 24-Jul-2013. Now if we use normal concatenation.
    =A1&B1 the output will look like this. Today Date is41479. So we need to use the text formula to convert the number in cell B1 to Date and then we can concatenate. The modified formula look like this.
    =A8&TEXT(B8,”dd:mmm:yyyy”) which shows the output as Today Date is24:Jul:2013.

    You can even use this formula with other excel formulas such as vlookup, hlookup. The formula to change the format of vlookup formula out is as mentioned below.
    =TEXT(VLOOKUP(B15,A13:B13,2,FALSE),”DD:MMM:YYYY”)

    Hope this helps to create your excel templates by using the Formula to Format Cell.

  • Excel If Function – Syntax And Examples

    Excel IF function is one of my favorite function in Excel. It is very useful and very simple to use. It does wonders when you want to create some complicated excel Formulas. You can extend the functionalities of IF function by nesting it or using along with other Excel Functions such as VLOOKUP, AND, OR etc.
    How Excel IF Function Works?
    Excel IF Function  checks for a condition(Criteria) and returns a value if the condition is met or returns another value if the criteria is not met. The criteria can be anything such as comparison, text check or error check etc. You can use nested IF functions upto 98 times in a excel worksheet.

    Syntax of Excel IF Function

    =if(condition, value if the condition is met, value if condition is not met)

    Examples:
    =if(A1>10, “Greater Than 10”, “Less than 10”)

    The Above IF formula returns Greater than 10 if the cell A1 has the value greater than 10 else returns Less than 10.

    Using IF function with AND

    As said earlier, you can use AND function inside IF  while you want a value to be written provides multi conditions were met. AND function returns TRUE if and only if  all the conditions are TRUE.For example, you have a value in cell A1. You want to check whether the number is in between 10 to 15. You can use the IF function as mentioned below.
    IF(AND(A1>10,A1

    Using IF function with OR

    IF and OR is used when you want to check any of the conditions is met. The OR Function returns true if any of the condition is met. For example you have want to check out of range if the number in cell A1 is less than  0 or greater than 100. You can use IF function with OR to calculate this as mentioned below.
    IF(OR(A1>100,A1

    Using Nested IF Function

    Using IF functions inside another IF function is called as nested IF functions. It is useful when you want to dig into the more detailed checks. For example you want to check if the number you have entered is a negative or positive in the cell A1.  First we need to check whether the entered value is number. If it is a number, then we need to check whether it 0. Then we need to check whether it is greater than 0 or less than 0 to find out the value entered is positive or negative. The nested IF function in Excel looks like as mentioned below.
    =IF(ISNUMBER(A1), IF(A1=0,”NIL”,IF(A1>0,”Positive Number”,”Negative Number”)),”It is not a Number”)
    The above uses ISNUMBER function to check for the whether the entered value is number or not.
    To learn how to use IF function with vlookup read my post on how to do vlookup on different ranges based on criteria.

  • Type Rupee Symbol in Excel 2010

    Ever since the introduction of Rupee symbol, usage is also increased. When we type, we would like to use Rupee symbol rather than Rs. I have already made a tutorial on how to type rupee symbol in keyboard windows. That post is useful if you want to write rupee symbol in MS word or blogging platforms such as blogger, WordPress etc.

    Recommended Reading:

    Type INR Symbol in Word

    Conditional VLOOKUP in EXCEL

    However, if you want to use Rupee symbol in  Excel 2010, there is a simple way than that. You can easily insert rupee symbol in excel spreadsheet by choosing the currency symbol rupee in the format tab. There is no need to install any update or any change of keyboard layout if you want to use Rupee symbol in excel 2010. Just follow the steps given below.

    Steps to Insert Rupee Symbol in Excel Worksheets

    Step1: Enter the values as desired.
    Step2: Select the cells which you want to insert rupee cell.
    Step 3: Right click and go to format cells.
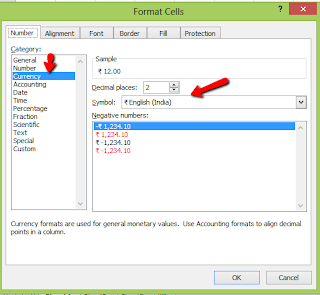
    Step 4: Select Currency from the category.  In the symbol drop down, scroll down till you see ₹ English (India).

    Step 5: Click Ok. Your cells are converted into currency and it shows along with the rupee symbol.
    Hope this help on inserting rupee symbol in excel. If you have any difficulties, please share in the comment section.

    Note:
    • If you are not able to find English (India) under the symbol, then you need to install the keyboard layout and make it as default.
    • If you want to enter Rupee symbol while entering in the cell, you can use shortcut key Ctrl+Alt+$(4) combination.
    • If you want to update many rows, then you need to use the method which I have mentioned above.
    • This method of typing Rupee symbol works with Excel 2016 also.

    Video guide on how to use Rupee Symbol in EXCEL