Tag: How to take screenshot

  • How to Take Screenshot on iPhone 6s and iPhone 6s Plus

    iPhone 6s or iPhone 6s Plus are the two new smartphones launched recently with iOS 9 OS. Both these smartphones offer lot of great features such as 3D touch, 4K video recording etc. It is powered by latest 64 bit A9 chip. If you are looking for how to screen capture or print screen on your new iPhone, then here is the guide on how to take screenshot on iPhone 6s and iPhone 6s Plus.

    Take screenshot on iPhone 6S Plus

    How to take screenshot on iPhone 6s and iPhone 6s Plus

    For taking screenshot on iPhone 6s or iPhone 6s Plus, there are 2 different methods available.

    Method 1: Taking screenshot using Sleep/Wake or Power button and home buttons

    • Press and Hold Sleep/Wake or Power button which is placed in the right side of the device.
    •  Without releasing the Power button, press Home button.
    • The screen will flickr and screenshot will be saved.

    Method 2: Taking screenshot on iPhone 6s and iPhone 6s Plus using  Assistive Touch feature

    Take screenshot using iPhone Assistive touch

    Taking screenshot using the Assistive Touch feature is very easy. If you are already enabled Assistive touch on your iPhone, then skip the below steps and directly move to next section.

    How to enable Assistive touch on iPhone 6s and iPhone 6s Plus

    • Go to Settings->General->Accessibility.
    • Scroll down till you find Assistive touch.
    • Move the slider to right to enable it.

    Taking screenshot on iPhone using Assistive touch

    • Tap on to floating assistive touch menu on the screen.
    • Tap on to Device.
    • In this screen, select More.
    • Now tap on to Screenshot.
    • Screen will flash and screenshot will be saved.

    Where taken screenshots on iPhone gets Saved?

    You can access taken screenshot in  Photos-> Recently added photos.

    Taking screenshot using Sleep/Wake or Power button and home buttons works on all the previos iPhons such as iPhone 4, iPhone 4s, iPhone 5, iPhone 5s etc. But assitive touch method of taking screenshot works with only latest versions of iOS. For turning on Assistive touch another simple method is to Tell Siri “Turn on AssistiveTouch.” .

  • How to take screenshot on Lenovo VIBE P1m

    Lenovo VIBE P1m is a newly launched Dual sim Android smartphone. The main USP of this smartphone is its 3900 mAh battery. The other features of the device are 1 GHz MediaTek MT6735P 64-bit Quad Core Processor, 2GB RAM, 16GB internal storage, 5 inch 720p display screen and 4G LTE. In this post we will learn to perform printscreen/screencapture on Lenovo VIBE P1m.

    Lenovo VIBE P1m is runs on Android 5.1 Lollipop along with VIBE UI. VIBE UI offers lot of customisation and useful features. Like any other Lenovo smartphone, in VIBE p1m too we have 2 methods of taking screenshot. So lets explore the different ways to capture screen on Lenovo VIBE P1m.

    Take screenshot on Lenovo Smartphone

    How to take screenshot on Lenovo VIBE P1m

    Method 1: Default Android or Power button+ Volume down Key: This is the standard method which works on all latest Android smartphones. For taking screenshot using this method follow the step given below.

    1. Go to the screen on which you want to take screenshot.
    2. Press and hold volume down and power button simultaneosly.
    3. The screenshot will be taken.
    4. The taken screenshot will be saved on Gallery->Screenshot folder.

    Method 2: Using the quick settings option

    Like we have seen on Lenovo A6000 and Lenovo K3 Note, on VIBE P1m also we can take the screenshot using quick settings options. For using this method of screen capturing, follow the steps given below.

    • Go to the screen on which you want to take screenshot.
    • Access the quick settings option by swiping down the screen.
    • In quick settings, you will find Screenshot icon.
    • Tap on to it. Screeenshot will be taken.
    • Taken screenshot will be saved on Gallery->Screenshot folder.

    Lenovo VIBE P1m currently available only on flipkart in India. The price of this device is Rs.7,999. Normally you need to register and buy this Lenovo smartphone from flash sale. But on Diwali offer, this smartphone is available on open sale.

    Video Guide on How to take screenshot on Lenovo Smartphones

  • How to take screenshot on Samsung Galaxy E5

    Samsung Galaxy E5 is a budget Dual sim Android smartphone.  The key features of this smartphone are 5 inch Super AMOLED display with 720pHD resolution(294 ppi pixel density), 1.2GHZ quad core processor, 1.5GB of RAM, 16GB internal storage, microSD card support upto 64GB, 8MP primary camera, 5MP front facing camera and 2400 mAh battery. This post we will focus on how to take screenshot on Samsung Galaxy E5.

    For performing print screen on Galaxy E5, there are 2 different methods available. The first method is default android method and the other one is through palm swipe method. The palm swipe method of taking screenshot at times didn’t work as expected. So I am providing both screen capturing methods.

    Recommended Reading:

    Samsung Galaxy E5 Review

    How to download PC Suite for Samsung Galaxy E5

    How to Take Screenshot on Samsung Galaxy E5

    Default Android Method or Power+Volume Down Key method

    For taking the screenshot using this method follow the steps given below.

    • Go to the screen on which you want to take the screenshot.
    • Now press and hold volume down and power button simultaneosly.
    • Screen will flicker and shutter sound will be heard. This confirms the screenshot on Galaxy E5 is taken.
    • The taken screenshot will be saved in Gallery->Screenshot folder.

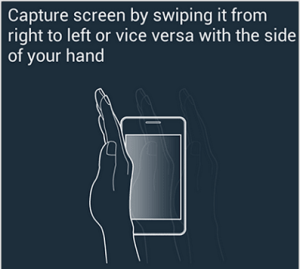
    Palm Swipe method of taking screenshot on Galaxy E5

    For using this method of screen capture on Galaxy E5, follow the steps given below.

    Enable Swipe Gesture:

    You need to enable swipe gesture before using the palm swipe method. For that go to Settings->”Motions and Gestures”. Screen down, you will find  “Hand Motion”, then enable the box “Palm Swipe to Capture”.

    Gesture way of taking screenshot

    • Now whenever, you want to take screenshot, just go to the screen on which you want to take the screenshot.
    • Now for taking screenshot, just swipe your hand from left to right or vice versa to take the screenshot.
    • The taken screenshot will be saved in Gallery->Screenshot folder.
     As mentioned before, the swipe gesture way of taking screenshot on Galaxy E5 sometimes does not works. In Galaxy E7 it works without any issue. It requires bit of practice.


  • How to take screenshot on Coolpad Note 3

    Coolpad Note 3 is a affordable phablet with fingerprint scanner. At the time of writing this article, probably this is the only Android smartphone with fingerprint scanner within the price of 9k. In this article, we will learn how to take screenshot on Coolpad Note 3.

    How to take screenshot on Coolpad Note 3

    There two methods through which you can perform print screen/screen capture on Coolpad Note 3.  First method is through default android method and another is three finger screenshot.

    How to take screenshot on Coolpad Note 3 through default android method

    • For taking screenshot using method, press and hold volume down and power button simultaneously. The screenshot will be taken. The taken screenshot will be saved on gallery->Screenshot folder.

    How to take screenshot on Coolpad Note 3 through three finger screenshot method

    Coolpad Note 3 Print screen

    UI on the Coolpad Note 3 offers lot of customisation. It offers many swipe gestures and fingerprint scanner customisation. There is also provision to capture screen on Coolpad Note 3.  For performing this method of print screen, follow the method mentioned below.

    • Go to Settings->Smart Control-> Action and Screen.
    • In the list of options, enable Three Screenshots by selecting it.
    • Now whenever, you want to take screenshot on Coolpad Note 3, swipe up or down with three fingers at your desired screen on which you want to capture will take the screenshot.
    • The taken screenshot using method will be saved in Gallery->Screenshot folder.

    Coolpad Note 3 though is a budget Android smartphone, it offers a lot of features to the user. With many customisation, useful tricks you can make many tasks with simple time saving methods.

    Coming to the specifications of Coolpad Note 3, it has 720p HD 5.5 inch display screen, 3GB of RAM, 13MP primary camera, 5MP front facing camera, 16GB internal storage and 3000 mAh battery. For the connectivity it supports 4G LTE. The device runs on Android 5.1 and the company’s own Cool UI skin.

    I will be making few more tips and tricks posts and review on Coolpad Note 3 in the coming days. If you have any specific queries and issues with the device, then share it the comment section below.

  • How to Take Screenshot on Asus Zenfone 2 Laser

    Asus Zenfone 2 Laser is most affordable smartphone under Zenfone 2 series. It has decent specification and competetive price tag. The laser focussed camera is the key attraction of this smartphone. In this post we will learn how to take screenshot on Asus Zenfone 2 Laser. The device runs on Android Lollipop with ZenUI. The ZenUI provide lot of customisation which enhances the user experience. It also includes many features which are very useful. For performing print screen on Zenfone 2 Laser,  there are 3 methods. You can choose any of these screen capture methods.

    Asus Zenfone Laser

    Recommended reading:

    Asus Zenfone 2 Laser Review

    How to take screenshot on Asus Zenfone 2

    How to use Asus Zenfone 2 Laser as Modem or Tethering

    How to Take screenshot on Asus Zenfone 2 Laser

    There are two variants of Asus Zenfone 2 Laser. Both variants support below mentioned ways of capture screen methods.

    Method 1: Default Android method

    It is the most common and widely used method of taking screenshot on any Android smartphone. For this you need to press and hold volume down key and power button simultaneously for few seconds. The screenshot is captured. You can access the taken screenshot from Gallery.

    Method 2: Using Recent apps key

    For taking screenshot on Asus Zenfone 2 Laser using this method, follow the steps given below.

    • First go to the “Settings”. Under settings, you will find “Asus ASUS customised settings” . Tap on to it.
    • In this, choose the ‘Recent apps key’.
    • Under Recent apps key settings, you will find “Tap and hold to capture screen”. Choose that.
    • Now, whenever, you want to take screenshot on any page, just tap and hold recent apps key to take the screenshot.

    Method 3: Take screenshot on Asus Zenfone 2 Laser using Quick Settings

    For enabling this method, you need to customise the Quick Settings menu in Zenfone 2 Laser. For that, follow the steps given below.

    • Go to Quick Settings page by swiping down the screen from top.
    • Tap on edit quick settings icon.
    • In the quick setting option, the top row provides only 4 tools. So you need to disable one app appearing in the top row and choose, screenshot.
    • Tap on to save.
    • Now when you need to take screenshot, go to quick setting menu, you will find screenshot option. Tap on to it to take the screenshot.

    Hope this tutorial on How to Take Screenshot on Asus Zenfone 2 Laser is useful. If you are facing any issues while following the instruction, please share it in the comment section below.