Category: Tips for the day

  • How to Create Windows 10 Bootable DVD or USB Disk

    Windows 10 is the latest operating system. There are plenty of reasons to upgrade your windows to the latest version. It also recieved good reviews from most of the reviewers. If you are running on genuine Windows 7 or Windows 8 with eligible specification, you are going to get Windows 10 update. So once you get automatic update to Windows 10, how to create a bootable DVD or Bootable USB disc for future resinstalls if required? We will learn on this.

    Microsoft provides a option to create Windows 10 bootable DVD or USB disc. It is upto you to decide which one you want create or even you can create both. Before, creating the bootable disc, you should to know few things. Here is the quick checklist.

    • Know the version of your Windows: That is your currently installed Windows is a home edition or pro version. Also make sure you note down whether it is 32 bit or 64 bit. You can know this by right clicking on “this PC”. Select properties. You will get a page which desscribes your windows version.
    • You should have a disc with minimum 4GB free space as process required 3GB of space. If you are usingUSB disc, then ensure you dont have any data on it. Before creating the tool, the disc will be formatted.

    How to Create Windows 10 Bootable DVD or USB Disk

    • First download and install the Windows 10 media creation tool. For downloading 32 bit version click here or for 64 bit version click here.
    • Once the  media creation tool is downloaded installed, launch the application.

    Windows 10 Bootable DVD creator

    • Choose the option “Create installation media for another PC”. Click Next.
    • On the screen, select the preferred laungauge, Edition(Home or Pro or Home Single Language) and Architecture on which you want to create bootable media for Windows 10. Then click Next.
    • This page it ask for you want to create USB disc or DVD.
    • If you choose, DVD, it will download the iso file. You need burn the image to DVD later. For burn the iso to DVD, there is direct option in Windows. Insert blank DVD and right click on the iso and choose burn image. It will create the bootable media for Windows 10.
    • If you choose USB, it will format USB disc and copy the necessory files to USB disc. Your USB bootable disc will be created. It takes 3GB of space in your USB disc. Also it removes all data you have stored before. So ensure you have the backup for the same.

    Hope this guide on how to create Windows 10 bootable media is useful. It is always recommended to have a bootable media with you. Incase of corrupt disc or if you want to do clean install Windows 10 from scratch, it is ideal to have your own Windows 10 bootable DVD or USB disc.

  • SMS Backup Plus Android App Review

    If you change your Android smartphone or giving it for service or if you reset your Android, then you will lose all the sms and call logs. You might have thought that, if there is free Android app which can backup all your sms and call logs automatically, then it would have been great. In millions of app in Google play store, there is an app called SMS Backup +. This app does this task. Lets have a quick overview on the review of SMS Backup Plus Android App.

    Backup SMS and Call Logs

    SMS Backup Plus Android App will automatically back up your SMS, MMS and call log entries into gmail. It inserts a separate label in Gmail/google calendar.  It is also equipped to restore the sms and Call log entries back into your device. I have used this service, as I need to reset my Moto G.  The back up to gmail worked flawlessly. The restore function doesn’t worked.  However, I can access all my messages and call log entries on my gmail which i feel sufficient for me.

    Features of SMS Backup Plus Android App

    • Automatically backup SMS, MMS and call log entries using a separate label in Gmail / Google Calendar.
    • You can set to backup on interval base or when you receive a new message.
    • Restore the SMS and call logs back into the device.

    How to Install and Setup SMS Backup Plus Android App

    • Go to Google playstore
    • Search for SMS Backup Plus. You will get the download link
    • Download it and install to your Android device such as Moto G, Moto E, Moto X, Zenfone, Redme 1s, Xiaomi Redme, Mi3 etc.
    • Launch the app and add your email account to the app.
    • It will start backup of your device based on your preference.
  • How to Run PHP Scripts Using XAMPP

    We all know that, XAMPP is a free open source cross platform web server solution stack package, which consist mainly Apache HTTP server, MySQL server database and interpreters for script written in the PHP and Perl Programming languages. It is a good tool for learners of PHP, Perl or mySQL. Here is the simple steps to installing the XAMP and start using this for running your PHP scripts.

    Steps to run PHP Scripts Using XAMPP

    1. As said above, you can download XAMPP for free. You can get your free copy from here.
    2. Open the downloaded file and install the applications.
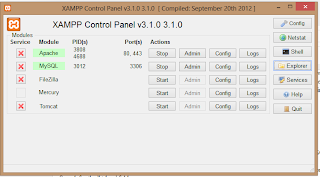
    3. Once installed, run the XAMPP control panel and start Apache and MySQL servers. Enable MySQL if your program needs database.

    running PHP scripts in XAMPP

    4. Click on the ‘Explore’ button on the XAMPP control panel. The new window opens with file explorer.  Search for the ‘htdocs’ folder.
    4. htdocs folder is the folder Apache server points to. In this folder you need to place the  PHP scripts your want to run.
    5. Open the browser and enter the address http:// localhost/yourphpscript.php, where yourphpscript is the script name of your php code.
    6. You can even create sub folders inside htdocs to place and run php scripts. If you are using folders insider htdocs, then you need to enter the following path in the browser address bar.
    http://localhost/foldername/yourphpscript.php where ‘foldername’ is the name of the folder which contains php scripts  created inside your htdoc folder.
    7. Your browser will execute the script and show the output.

  • How to Calculate Service Level In a Inbound Call Center

    The Inbound call center or contact center service level is one of the key factors to track the performance. Though it cannot be defined directly. This is because, the calculation depends on requirements. Some companies consider abandoned calls and some do not consider. In general we can define service level as the number of calls answered within the threshold.  Below is the formula to calculate service level percentage.

    Formula to Calculate Service Level Percentage in Inbound Call Center

    As said above, the formula to calculate changes with company to company. So below is the formula which most of the companies use.

    Service Level %= (Total Calls Answered within threshold/Total Calls Offerred)*100

    The above formula is not considering the abandoned calls. So if you need to consider that, then you should use below formula.

    Service Level %=(Total Calls Offerred-Total Calls Answered after threshold-Total calls abandoned after threshold)/(Total Calls offered-Total calls abandoned within threshold))

    Where
    ‘Total Calls Answered after threshold’ is nothing but the number of calls answered after the target time frame. Depending on the business, each company defines the time. Some may say 20 sec ,10 sec,120 sec etc to answer the call,
    Abandoned after threshold or Within Threshold- This is the calls abandoned within the target time. Some companies do not consider calls which gets abandoned within 10sec or 20 sec. It can be a higher value too.

    Examples on calculating service level % in a Inbound contact center

    In a day, a contact center gets 1000 calls and 40 calls answered after the threshold time of 20 sec. 60 calls got abandoned after threshold of 10 sec and 30 calls within threshold.  What is service level?
    The total calls answered=(1000-30+60)=1030
    Total calls answered within threshold is (910-40)=990
    Service level=(1000-40-60)/(1000-30)=92.78%