Ubuntu 16.04 LTS comes with lot of new features and functionality. It is fast and more user friendly now. In this post we will have look into Ubuntu trick which helps user to create automatically changing wallpaper slideshow. This works even with older version of Ubuntu.
How to create automatically changing wallpaper slideshow in Ubuntu
If you are a Windows user, you might have already know about themes which automatically changes wallpapers. So you might be wondering is there is any simple way to create automatically changing wallpaper in Ubuntu using the images coming from a pictures folder, or pre-selected folder with pre selected time?
There are many custom programs which helps you to do the same. However, if you don’t want install any other application and perform automatically changing wallpaper in Ubuntu, there is a way. You can use pre installed photo manager called shotwell.
How to create automatically changing wallpaper slideshow in Ubuntu using Shotwell Photo Manager
First you need to import the photos which you want to the Shotwell Photo Manager.
You can do that by going to File->Import from Folder. Browse the folder where you have saved photos which you want to set as slideshow.
Now select the photos which you want to add it to the slideshow of wallpapers in Ubuntu.
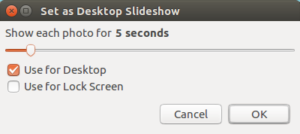
Go to File->Set as Desktop Slideshow.
You customize time period for the images to change by moving the slideshow to the left or right. The minimum time you can set for changing the wallpaper is 5 sec and maximum 1 day.
You can also set this for lock screen as well.
As mentioned before, it is one of the way to set automatically changing wallpaper on Ubuntu on desktop and on lock screen. It is the simplest method because it does not need any additional programs or software. Shotwell photo manager is pre installed program on Ubuntu.
The much awaited Ubuntu 16.04(‘Xenial Xerus’) is launched now and available for the users. You can directly update from previous version or you can perform clean install of new version by directly downloading from the official page. Here are the some of the useful tips and tricks on Ubuntu 16.04.
Ubuntu 16.04 Tips Tricks and FAQ
How to create bootable USB pendrive or USB stick for Ubuntu 16.04 in Windows 10?
There are multiple ways through which you can create bootable Ubuntu USB drive on Windows. The simplest one which I came across is using the Win32 Disk Imager application. It provides graphical interface.
First download the Ubuntu 16.04 ISO image file.
Download Win32 Disk Imager application. You can download it from here.
Insert your USB stick.
Note the drive letter assigned to your flash media.
Start Disk Imager.
Select the downloaded file and target device, and click “Write”.
Remove your flash media when the operation is complete.
How to install Google Chrome in Ubuntu 16.04?
You can download the latest Google Chrome for Ubuntu 16.04 from the official download page from here.
Unable to install Google Chrome on Ubuntu 16.04. How to fix it?
One of the way to fix error in installing Google chrome in Ubuntu 16.04 is by fixing the broken package through terminal.
Download the Google Chrome linux variant.
Now open the terminal.Shortcut to open terminal is Ctrl+Alt+t.
Now go to the folder in which you have downloaded the Chrome. By default it is Downloads folder.
If you have saved the chrome installation file in downloads folder, then type “cd Downloads”. Hit Enter on keyboard.
Now type “ls”.
It will show all the files in the folder Downloads.
Copy the full file name of chrome installation file.
Now type “sudo dpkg -i google-chrome-stable_current_amd64.deb”. (Here google-chrome-stable_current_amd64.deb is the file name. You can change the file name according to the file name you have given.)
It will install the google chrome. If you find any error related to broken packages, then type the following.
sudo apt-get -f install.
Now once again execute “sudo dpkg -i google-chrome-stable_current_amd64.deb”.
It will be installed now.
How to move unity launcher to the bottom of the screen in Ubuntu 16.04?
You can move the Unity launcher to bottom of the screen and use as dock style launcher by following the steps given below.
Open the terminal(Ctrl+Alt+T).
Type “gsettings set com.canonical.Unity.Launcher launcher-position Bottom”
Unable to view Kannada fonts on Ubuntu 16.04? How to fix this?
If you are facing issue in rendering Kannada fonts in Ubuntu 16.04, follow the steps given below. It will also fix the Kannada font rendering issue in Chrome and Firefox browser as well.
Open Terminal
Type sudo apt-get install fonts-lohit-knda fonts-knda.
It will install all the required kannada fonts in Ubuntu 16.04. Now you will be able see the kannada fonts.
How to create automatically changing wallpaper in Ubuntu 16.04?
If you want to create a slideshow of your photos as your wallpaper, you can use “Shotwell” application. This is installed by default.
Open the Shotwell.
Import the photos which you want to add it to the slideshow.
Select the photos you want in the slideshow.
Now Go to File → Set as Desktop Slideshow or press Ctrl+B.
Adjust time settings for the duration for each photos to show up.
How to fix booting issue of Ubuntu 16.04 after installing windows 10 or Vice versa?
There is a simple tool called Boot repair which comes handy. It can repair frequent boot issues you may encounter in Ubuntu like when you can’t boot Ubuntu after installing Windows or another Linux distribution, or when you can’t boot Windows after installing Ubuntu, or when GRUB is not displayed anymore, some upgrade breaks GRUB, etc. I have written a detailed post on this. You can read more on this here How to Fix Windows Booting Issue after Installing Ubuntu Or Vice Versa.
How to take screenshot on Ubuntu 16.04?
Capturing print screen on Ubuntu 16.04 is very easy. You have a programme called screenshot. Open application. You have the option capture whole screen or certain portion of screen or only active screen. There is a option to take screenshot with time delay.
Today to troubleshoot battery not charging issue due to over heating on my Dell laptop running on Windows 8, I have decided to load the Ubuntu OS onto my system. Ubuntu is known as one of the best free Linux operating system available today. I have downloaded the Ubuntu and installed in a new partition on my hard disk. It got installed properly without any issues. I was able to boot and work on Ubuntu OS. But when I restarted my PC, Windows 8 is not loading! However I was able to boot on Ubuntu. I am new to Ubuntu eco system, so I did research on forums to fixing this problem. My Windows 8 partition is intact and the only problem is, GRUB is not working as expected. After a some 8 to 10 minutes of research on forums, I got a very simple and quick solution to it. So I am sharing the same solution to you which worked for me.
Steps to Fix Windows 8 Booting Issue after Installing Ubuntu
Boot-Repair Tool
To Fix this, there is a simple program called Boot-Repair. It is a small and very useful tool to fix issues such as, you can’t boot Ubuntu after installing Windows or another Linux distribution, or when you can’t boot Windows after installing Ubuntu, or when GRUB is not displayed anymore, some upgrade breaks GRUB, etc. Below are the steps to fix the boot loader. Ensure you are connected to the Internet before starting below steps.
1. First you need to install the Boot-Repair Tool. To do this, first open Terminal by pressing Keyboard shortcut Ctrl + ALT + T. In the terminal enter the code given below. (You can copy and paste the code in Terminal. To do so, just copy the codes given below and go to the Terminal, right click on the mouse and select Paste. The Ctrl+V shortcut doesn’t work in Terminal..)
It will ask for your admin password. Enter it. It will download all the required repositories. Once it completes , enter the below code in the Terminal.
2. It will finish installing the Boot-Repair tool. 3.Launch ‘Boot-repair’ by typing ‘boot-repair‘ in a terminal 4.Then click the “Recommended repair” button. It will take some time to repair. Once the repair is finished, note the URL (paste.ubuntu.com/XXXXX) that appeared in a paper, then reboot. My problem is resolved at this stage. 5. If you still face issue then, indicate the URL which you have noted down to people who help you by email or forum which is provided in the last screen of the repair process.
Steps to Fix Ubuntu Booting Issue after Installing Windows 8
This one I have not tried. However, I am just quoting the solution provided in the forum. Here I assume that you have installed Ubuntu first and then installed Windows 8. Now you cannot boot on to Ubuntu. In this case, first boot your computer ona Ubuntu live-CD or live-USB.Then follow the same procedure mentioned above. It updates GRUB and you will be able to access Ubuntu.
Ubuntu 11.10 automatically uses Unity as default session and fall back to 2D for the systems which do not have 3D graphic controllers. To use Ubuntu Classic Desktop(GNOME), you need do little tweaking.
Steps to be followed to use Ubuntu Classic Desktop(GNOME) in Ubuntu 11.10
Open the terminal. To open terminal, keyboard shortcut is Ctrl+Alt+T
In terminal, type sudo apt-get install gnome-session-fallback