Category: Windows Tips

  • Duplicate Photo finder for Windows: Review Duplicate Photos Fixer

    Asking about the storage space on the laptop, and computers from users force them to scratch their head since they mostly keep running out of space!If you are quick photo-snapper and love to share pictures, then thousands of pictures must be accumulated on your hard-disk. But from those un-scattered photos, duplicate photos must be those leading to the untidy photo collection and eating space. Scan your Windows system and you will eventually come to know that duplicate photos are the actual reason behind the shortcoming of space.

    Know how duplicate photos clog space in our system

    The most commonly observed reasons for the accumulation of duplicate photos in our systems are:

    • Transferring and copying photos from one storage device to another.
    • Importing photos that we have already in our system but we are unaware or have forgotten about it.
    • Editing pictures through editing tools save a new copy of the photo with a different name.

    Now, what you are left with is a messy photo-gallery! It is no less than a nightmare to have unorganized photo collection! Thinking of  searching photos manually can make you go crazy. We recommend you to use Duplicate Photos Fixer Pro for your Windows to remove duplicate photos.

    Features

    Let’s take a deep insight of Duplicate Photos Fixer Pro and see how it helps in deleting duplicate photos:

    Add photos with one click

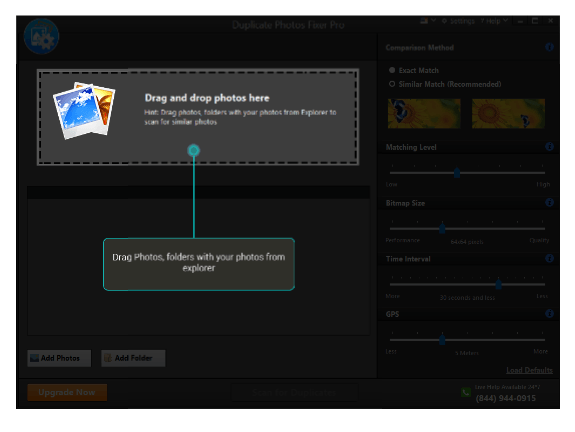
    Duplicate Photos Fixer Pro’s drag and drop method and Add files or Folders option lets you easily add photos to the app painlessly. Its user-friendly interface aims at saving your time and efforts. It is easy to use even for the novice.

    Screenshot from 2016-05-30 18-07-36

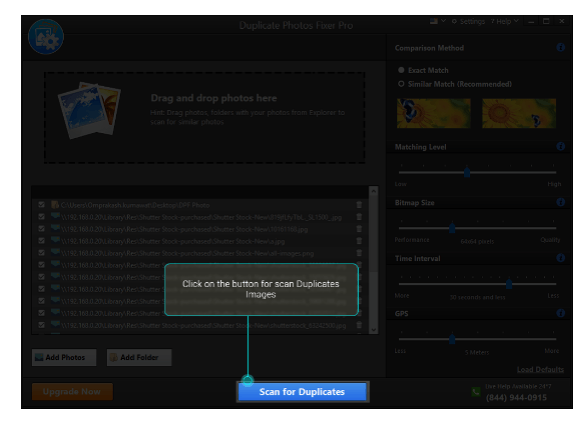
    Scan what you desire

    Simply add folders and files to the app for scanning and removing duplicate photos. You can scan your whole hard drive by adding its path or can only add a few of the folders from your system. And to put a cherry on the cake, it supports internal as well as external storage devices. Add your pen drives, and external disk to de-clutter them from duplicates.
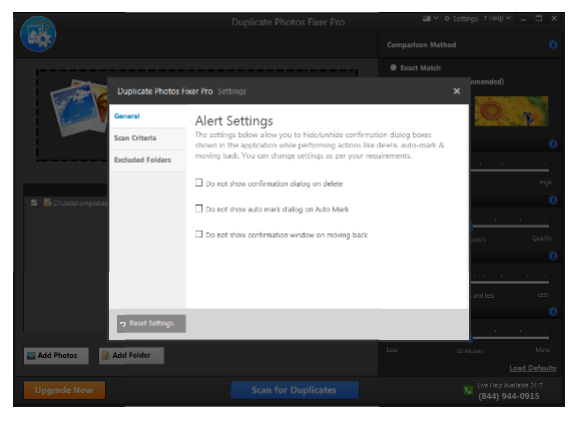
    Screenshot from 2016-05-30 18-07-54

    Exclude folders

    You can exclude folders which you do not wish to scan by simply adding it to the exclusion list. Add the files and folders and you are done! You can undoubtedly change the list by adding or removing folders and files from it.

    Screenshot from 2016-05-30 18-08-08

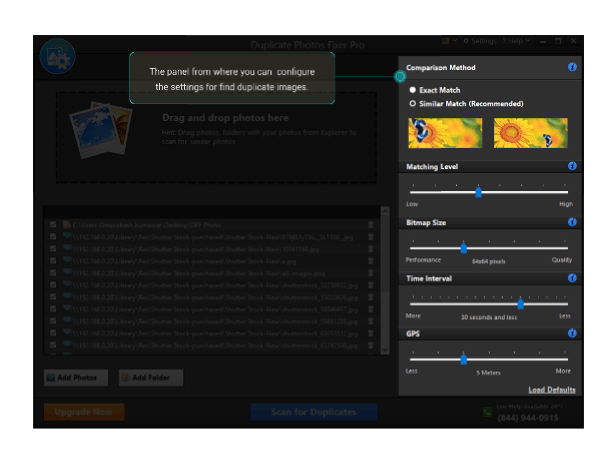
    Set scanning criteria to obtain accurate results

    Setting the criteria to search duplicate photos will give you more accurate results.

    Screenshot from 2016-05-30 18-08-22

    Scan History

    The scan history feature helps in referring to the details of the scans that previously took place. It will save time for scanning in future.

    Group-wise Result

    The results of scanning are displayed group-wise in order to make it easy for user to identify duplicates. One photo from each group is unmarked to consider it as the best on the basis of dimension and resolution to keep it in the system.

    Screenshot from 2016-05-30 18-08-50

    Get Organized photo-library

    And ultimately, with duplicate Photos Fixer Pro, you will have uncluttered and organized photo library. You can sift through your photos seamlessly. Download Duplicate Photos Fixer Pro on your Windows and free up plenty of space!.

    Screenshot from 2016-05-30 18-09-04

    Download Duplicate Photos Fixer Pro on your Windows and free up plenty of space!.

    This is a sponsored post.

  • How to Create Windows 10 Bootable DVD or USB Disk

    Windows 10 is the latest operating system. There are plenty of reasons to upgrade your windows to the latest version. It also recieved good reviews from most of the reviewers. If you are running on genuine Windows 7 or Windows 8 with eligible specification, you are going to get Windows 10 update. So once you get automatic update to Windows 10, how to create a bootable DVD or Bootable USB disc for future resinstalls if required? We will learn on this.

    Microsoft provides a option to create Windows 10 bootable DVD or USB disc. It is upto you to decide which one you want create or even you can create both. Before, creating the bootable disc, you should to know few things. Here is the quick checklist.

    • Know the version of your Windows: That is your currently installed Windows is a home edition or pro version. Also make sure you note down whether it is 32 bit or 64 bit. You can know this by right clicking on “this PC”. Select properties. You will get a page which desscribes your windows version.
    • You should have a disc with minimum 4GB free space as process required 3GB of space. If you are usingUSB disc, then ensure you dont have any data on it. Before creating the tool, the disc will be formatted.

    How to Create Windows 10 Bootable DVD or USB Disk

    • First download and install the Windows 10 media creation tool. For downloading 32 bit version click here or for 64 bit version click here.
    • Once the  media creation tool is downloaded installed, launch the application.

    Windows 10 Bootable DVD creator

    • Choose the option “Create installation media for another PC”. Click Next.
    • On the screen, select the preferred laungauge, Edition(Home or Pro or Home Single Language) and Architecture on which you want to create bootable media for Windows 10. Then click Next.
    • This page it ask for you want to create USB disc or DVD.
    • If you choose, DVD, it will download the iso file. You need burn the image to DVD later. For burn the iso to DVD, there is direct option in Windows. Insert blank DVD and right click on the iso and choose burn image. It will create the bootable media for Windows 10.
    • If you choose USB, it will format USB disc and copy the necessory files to USB disc. Your USB bootable disc will be created. It takes 3GB of space in your USB disc. Also it removes all data you have stored before. So ensure you have the backup for the same.

    Hope this guide on how to create Windows 10 bootable media is useful. It is always recommended to have a bootable media with you. Incase of corrupt disc or if you want to do clean install Windows 10 from scratch, it is ideal to have your own Windows 10 bootable DVD or USB disc.

  • How to boot to Desktop mode in Windows 8.1 when signing in

    When Microsoft launched Windows 8, it was major change in the Windows operating system. It is optimised for touch screen. The new metro style menu are not feels good on non touch screen device. There was no way to booting to desktop without any third party application.

    The new Windows 8.1 update brings in this feature. This features enables to directly boot to Desktop mode.  Apart from this there are many other bug fixes and feature enhancement also part of this update. This post, we will learn how to directly boot into desktop mode when signing in.

    Steps to Boot to Desktop Mode in Windows 8.1 Pro

    boot to desktop mode

    • First start the windows. Once the system boots, click on Desktop tile or hit Windows Key+D shortcut key
    • Right click on any open area in taskbar, then click on properties.
    • In the newly opened dialog box, Click Navigation tab.
    •  Now check mark the option “When i Sign in or Close all applications on a screen, go to the desktop instead of Start”
    • Click on the apply and then Ok. Reboot the system. You will booting into the desktop mode.
    • If you want to go back to start-screen booting, then repeat the same procedure and uncheck the option in the 4th step of above.

    Thats it. Now you are no longer see the start-screen when you  switch on your PC. If you want load start-screen, then hit start button in the left bottom corner or Windows shortcut key. If you have any problem following this do leave a comment.

  • Free Space by deleting the Windows Old files

    If you have installed newer version of Windows or reinstalled the your windows without formatting the drive, then you will notice a folder called Windows.old. This folder contains the files of your previous Windows files. It is very difficult to remove this folder manually. However you can use Windows built in feature called Disc cleanup to remove this folder. Ideally Windows.old folder is not required as it will be transferred to your newer version of Windows. Having said that, have a quick check on this and confirm that you have the data in your required place.
    Windows Disc Cleanup utility is also useful for removing temporary files,files in Recycle Bin etc . This will free up your hard disc drive. This will be very useful when you start getting notification on disc full.

    Steps to Clean up Windows.Old folder to free the space

    1. Go to ‘my computer’ by clicking desktop icon or by start menu. If you  are using Windows 8, then use Windows+E shortcut key to get My computer. 
    2. Right click on the drive where you have installed Windows.
    3. Click on properties from the menu list.
    4. In the General Tab, you will find a icon called Disc cleanup. Click on that.
    Disc Cleanup windows
    Disc cleanup

    5. Click on Clean Up System files.

    Windows drive cleaning
    Disc Cleanup menu

    6. The new Pop up menu comes out. In that select the Previous Windows Installation,Temporary Windows Installation files checkbox. You can even select Windows Update cleanup and Windows Upgrade Log files.
    7. Click on Ok to start clean up your temporary data.
    8.  It will take few seconds and the Windows.old folder is removed from your disc.

  • Steps to Fix Windows 8 Booting Issue after Installing Ubuntu Or Vice Versa

    Today to troubleshoot battery not charging issue due to over heating on my Dell laptop running on Windows 8, I have decided to load the Ubuntu OS onto my system. Ubuntu is known as one of the best free Linux operating system available today. I have downloaded the Ubuntu and installed in a new partition on my hard disk. It got installed properly without any issues. I was able to boot and work on Ubuntu OS. But when I restarted my PC, Windows 8 is not loading! However I was able to boot on Ubuntu. I am new to Ubuntu eco system, so I did research on forums to fixing this problem. My Windows 8 partition is intact and the only problem is, GRUB is not working as expected. After a some 8 to 10 minutes of research on forums, I got a very simple and quick solution to it. So I am sharing the same solution to you which worked for me.

    Steps to Fix Windows 8 Booting Issue after Installing Ubuntu

    Fixing Boot Issues of Windows 8
    Boot-Repair Tool
    To Fix this, there is a simple program called Boot-Repair. It is a small and very useful tool to fix issues such as, you can’t boot Ubuntu after installing Windows or another Linux distribution, or when you can’t boot Windows after installing Ubuntu, or when GRUB is not displayed anymore, some upgrade breaks GRUB, etc.  Below are the steps to fix the boot loader. Ensure you are connected to the Internet before starting below steps.
    1. First you need to install the Boot-Repair Tool. To do this, first open Terminal by pressing Keyboard shortcut Ctrl + ALT + T. In the terminal enter the code given below. (You can copy and paste the code in Terminal. To do so, just copy the codes given below and go to the Terminal, right click on the mouse and select Paste. The Ctrl+V shortcut doesn’t work in Terminal..)

      sudo add-apt-repository ppa:yannubuntu/boot-repair && sudo apt-get update

    It will ask for your admin password. Enter it. It will download all the required repositories. Once it completes , enter the below code in the Terminal.

    sudo apt-get install -y boot-repair && (boot-repair &) 

    2. It will finish installing the Boot-Repair tool.
    3.Launch ‘Boot-repair’ by typing ‘boot-repair‘ in a terminal
    4.Then click the “Recommended repair” button. It will take some time to repair. Once the repair is finished, note the URL (paste.ubuntu.com/XXXXX) that appeared in a paper, then reboot. My problem is resolved at this stage.
    5. If you still face issue then, indicate the URL which you have noted down to people who help you by email or forum which is provided in the last screen of the repair process.

    Steps to Fix Ubuntu Booting Issue after Installing Windows 8

    This one I have not tried. However, I am just quoting the solution provided in the forum. Here  I assume that you have installed Ubuntu first and then installed Windows 8. Now you cannot boot on to Ubuntu. In this case, first boot your computer on a Ubuntu live-CD or live-USB.Then follow the same procedure mentioned above. It updates GRUB and you will be able to access Ubuntu.