Samsung has launched its Galaxy J5 2016 edition smartphone in India. The smartphone comes in Radiant Gold, Midnight Black, and Pearl White colour variants. It will be available exclusively on Flipkart starting 10th May 2016. By looking at the specification and features, here are the some of the cons of Samsung Galaxy J5 2016 edition.
Samsung Galaxy J5 2016 is an incremental upgrade over its predecessor. Coming to the pros of Galaxy J5 2016 over its predecessor are mentioned below.
Advantages of Samsung Galaxy J5 2016 compared to Galaxy J5 2015
Better design and build quality.
Bigger battery. (3100 mAh battery Vs 2600 mAh battery).
Bigger display screen.(5.2 inch screen vs 5 inch screen).
Inclusion of NFC.
Higher RAM. (2GB of RAM instead of 1.5GB)
Cons of Galaxy J5 2016 Edition
As mentioned before, these are the cons of Galaxy J5 2016 editions based on the specification.
Same camera: Galaxy J5 2016 has the same camera specifications as that of its predecessor. It has 13MP primary camera with F1.9 and LED flash. It also has 5MP front facing camera.
No Full HD Display screen: Samsung has increased the size of the display screen of 2016 edition of Galaxy J5. But it continued the same screen resolution of 720p. Hence the pixel density is reduced compared to 2015 edition of Galaxy J5.
No major upgrade over CPU and GPU: The Galaxy J5 2016 is powered by Qualcomm Snapdragon 410 quad core CPU clocked at 1.2GHz along with 2GB of RAM. There are many devices at this price range has more powerful SoC.
No Fingerprint scanner: Being priced at Rs.13,990, it was expected to have fingerprint scanner. The devices like Honor 5X, Coolpad Note 3 etc have fingerprint scanner and priced much lower than this device.
Omission of basic sensors: Samsung Galaxy J5 2016 does not feature basic sensors like light sensor, compass etc.
No LED Notification light: The LED notification light is not available in this device also.
At an event held in Mumbai, LeEco has launched new variant of Le 1s smartphone in India. It is called as LeEco Le 1s (Eco). It will come with 1 year subscription for LeEco membership which is priced at Rs. 4,900. The first flash sale of this smartphone will start on 12th May at 2PM via Flipkart. The price of LeEco Le 1s Eco in India is Rs.10,899. However, the first 1,00,000 will be available for a introductory price of Rs.9,999.
LeEco Le 1s Eco features 5.5 inch full HD(1080×1920 pixel) in cell IPS LCD display with 500-nit brightness and 403 ppi pixel density. It runs on LeEco’s custom EUI based on Android OS. Le 1s Eco is powered by 64-bit octa-core MediaTek Helio X10 SoC clocked at 1.85GHz coupled with 3GB of RAM and PowerVR G6200 GPU.
LeEco Le 1s Eco comes with 32GB of internal storage. Sadly there is no support for microSD card. However, company introduced LeEco Drive which provides 5TB of cloud storage for every LeEco user. It also features mirror-surfaced fingerprint sensor with a 99.3 percent precision rate.
LeEco Le 1s Eco sports 13MP primary camera with PDAF that can record video is 4K resolution, along with a 5MP front facing camera. The connectivity features of the device includes 4G, 3G, GPRS/EDGE, Wi-Fi, GPS/AGPS, Bluetooth, Infrared, WLAN, USB OTG, and USB Type-C. Le 1s Eco has 3000 mAh battery with fast charging support. As per the company statement, 5 minutes of charging will provide 3.5 hours of talk time. It uses USB Type-C port to charge the battery.
LeEco Le 1s Eco weighs 169 grams and measures 151.1×74.2×7.6mm. The company has said that, now it has 550 service centres in India, and 24/7 live chat in 8 different languages. LeEco also announced that, Le 1s Eco will support 10 indian languages in an upcoming OTA update. The supported Indian languages will be Assamese, Bengali, Gujarati, Kannada, Malayalam, Marathi, Oriya, Punjabi, Tamil, and Telugu.
LeEco Le 1s Eco Specification
5.5 inch full HD(1080×1920 pixel) Display
1.85GHz 64-bit octa-core MediaTek Helio X10 SoC with 3GB of RAM and PowerVR G6200 GPU.
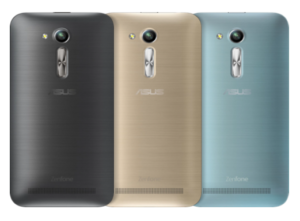
ASUS has been known in the smartphone market for being the go-to brand when consumers look for luxury specifications without a price tag that breaks the bank. The latest offering from the company on these lines is the Zenfone Go 4.5 2nd generation.
Design and Build
With a metallic hairline finish, the phone, at the first glance itself resembles a premium product. The phone also comes with an ergonomic arc design, managing to be only 3.6 mm at its thinnest edge. This feature, along with the rear key positioning on the phone allows the user to have intuitive one hand control, thus, making it really easy to multitask. The finish on the phone can be attributed to the unique, molding techniques which in turn, has ensured that the phone does not weigh on the heavy side. All of this, has resulted in a phone, which is easy for the user to hold and experience. The company has further compressed the powerful processor, the dual sim card, and the thin design in such a way, that the form factor of the phone retains its usability quotient. One important aspect of their design is the positioning of the buttons.This has ensured that both, right-handed and left-handed people can use it with equal ease.The phone is also available in a variety of colours to suit your mood and personality.
Camera
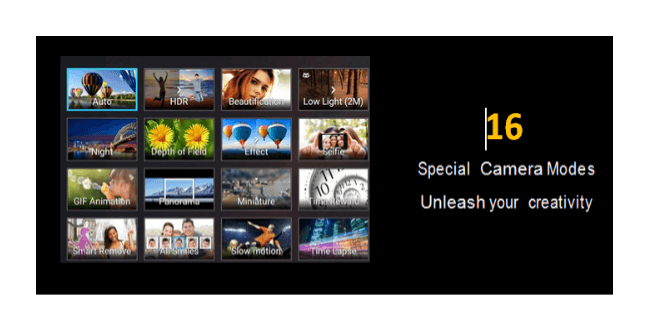
Coming to the camera specifications on the phone, it comes with a rear camera of 5MP and a front camera of 0.3MP. While the 5MP camera might not look like a big deal to us tech experts used to camera specifications of 13 MP and higher, but for a price tag of just Rs. 5,299 – this camera manages to be very appealing. However, ASUS is also offering users an additional choice, in this category, as there is a second variant of the ZenFone Go 4.5 2nd generation that comes with a rear camera of 8MP and a front camera of 2MP priced at Rs 5,699. This variant would definitely satisfy the clicking enthusiast in you. Apart from this, it’s really the features that come built into the camera that excites the reviewer in me. Along with the ‘PixelMaster’ technology unique to ASUS, also inbuilt into the phone are a total of 16 different modes- be it for clicking pictures during the day or night. The zero shutter lag also ensures perfect photos in a snap.
Three of the modes that stood out for me were as below-
Backlight HDR Mode
This mode reduces the shadow effect and therefore allows the images to have a better brightness and contrast factor by expanding the dynamic range of the shot. The detailing results in flawless images captured- all the time.
Low Light Mode
This feature increases the light sensitivity of the image by up to 400%, while reducing the noise and boosting the colour contrast every time. A feature that allows the users to produce clear and bright images in low light as well – this camera is ideal for users who do not wish to worry about the light condition when capturing something they like.
Beautification Mode
On your endless selfie clicking rampages, when out with friends, this phone is your perfect companion, as the beautification mode subtly balances the facial features, softens the tones and removes blemishes to make you and your friends look even better. Just when you think that was enough for all your clicking needs, the phone also has built-in MiniMovie application. This application allows users to combine different photos into short movies which can be further made interesting by adding musical notes and text of your choice. Your creations can then be quickly shared through social media, email, cloud services, and YouTube.
Storage
Despite being in the budget category, the phone still comes with adequate storage capacity – a 1GB RAM, which ensures that you never have to worry about seeing the dreaded – ‘phone capacity full’ message pop up on your phone. The Zenfone Go 4.5 2nd generation additionally offers 100 GB of accompanying Google Drive storage – that too, free for 2 years! You would have to redeem the offer on the Google Drive app by April 1st, 2018.
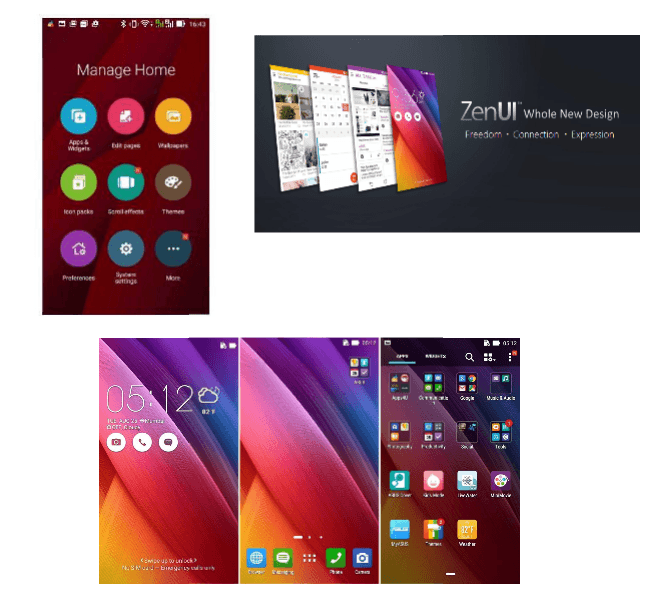
The ASUS ZenUI
Personally, my favorite aspect on ASUS’ Zenfone range is the ZenUI; it is ASUS’ personalized gift to its users. With a new visual design and features, it allows for classic customization on your phone. The ZenUI is simple, beautiful and brilliant all at the same time. It allows you to have a lock screen accompanied by a customizable font and icon. It has redesigned icons, optional folders, weather and time widgets different, and a variety of ASUS color themes for your use. Further, within the ZenUI, the idea that excites me the most is the ‘ZenMotion’- which allows users to access everything on their phone with just an easy swipe to launch a variety of applications, see notifications of incoming messages, missed calls, and a lot more. It also has a new Boost feature- which acts like your phone’s personal clean up assistant- just by tapping the icon, Boost will clean up background applications to free your phone’s memory and increase its speed.
ZenUI Launcher
In particular, for this, one has to simply swipe up on the home screen to access easy customization tools. You can then go ahead and choose your wallpaper, pick your icons and arrange your apps in a moment.
Performance
The phone matches your needs of smart and quick performance at every step with its Qualcomm quad core CPU@1.2GHz, and dual sim-dual standby feature. Additionally, the Sonic-Master Technology delivers crystal clear sound to your ears, satisfying the music-lover in you. The phone is also probably more obsessive than you, about conserving power especially when searching for a signal, thus significantly increasing its standby time. It has an advanced antenna design that ensures fantastic performance, even in areas with poor signal. Be it for your social media needs, or your routine daily tasks, the phone has adequate capability built into it, to offer a power-packed performance.
To conclude- this phone is perfect for those users that look for class, appeal and performance, without burning a hole in their pocket. The variant with the 0.3MP/5MP (front + rear) camera being priced at just Rs. 5,299, and the 2MP/8MP (front + rear) camera at INR 5,699; it can literally be the ‘Go-To’ phones for the budget smartphone section and is bound to make heads turn when you take it out in public. With multiple features on it, that still do not compromise on build, aesthetic or specifications quality, the Zenfone Go 4.5 2nd generation does all that and more, acting like the ultimate ‘Zen’ companion to your fast paced life.
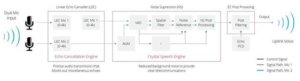
Noise Cancellation:
We live in a world that is noisy all the time, and to reflect on that real time experience, ASUS has come up with the NoiseTalk Zero which is an innovative combination of linear-echo-cancellation (LEC) and noise-suppression (NS) that works towards wiping out audio rebound and in reducing background noise to a minimum. In fact, the Zenfone’s LEC is 1.2X (20%) better at blocking echoes and is 2.3X (130%) more effective at noise suppression in multiple environments comparatively. As a result, users get the chance to experience crystal-clear quality during their calls.
Ubuntu 16.04 LTS comes with lot of new features and functionality. It is fast and more user friendly now. In this post we will have look into Ubuntu trick which helps user to create automatically changing wallpaper slideshow. This works even with older version of Ubuntu.
How to create automatically changing wallpaper slideshow in Ubuntu
If you are a Windows user, you might have already know about themes which automatically changes wallpapers. So you might be wondering is there is any simple way to create automatically changing wallpaper in Ubuntu using the images coming from a pictures folder, or pre-selected folder with pre selected time?
There are many custom programs which helps you to do the same. However, if you don’t want install any other application and perform automatically changing wallpaper in Ubuntu, there is a way. You can use pre installed photo manager called shotwell.
How to create automatically changing wallpaper slideshow in Ubuntu using Shotwell Photo Manager
First you need to import the photos which you want to the Shotwell Photo Manager.
You can do that by going to File->Import from Folder. Browse the folder where you have saved photos which you want to set as slideshow.
Now select the photos which you want to add it to the slideshow of wallpapers in Ubuntu.
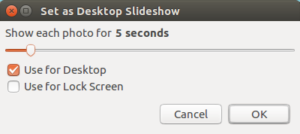
Go to File->Set as Desktop Slideshow.
You customize time period for the images to change by moving the slideshow to the left or right. The minimum time you can set for changing the wallpaper is 5 sec and maximum 1 day.
You can also set this for lock screen as well.
As mentioned before, it is one of the way to set automatically changing wallpaper on Ubuntu on desktop and on lock screen. It is the simplest method because it does not need any additional programs or software. Shotwell photo manager is pre installed program on Ubuntu.
The much awaited Ubuntu 16.04(‘Xenial Xerus’) is launched now and available for the users. You can directly update from previous version or you can perform clean install of new version by directly downloading from the official page. Here are the some of the useful tips and tricks on Ubuntu 16.04.
Ubuntu 16.04 Tips Tricks and FAQ
How to create bootable USB pendrive or USB stick for Ubuntu 16.04 in Windows 10?
There are multiple ways through which you can create bootable Ubuntu USB drive on Windows. The simplest one which I came across is using the Win32 Disk Imager application. It provides graphical interface.
First download the Ubuntu 16.04 ISO image file.
Download Win32 Disk Imager application. You can download it from here.
Insert your USB stick.
Note the drive letter assigned to your flash media.
Start Disk Imager.
Select the downloaded file and target device, and click “Write”.
Remove your flash media when the operation is complete.
How to install Google Chrome in Ubuntu 16.04?
You can download the latest Google Chrome for Ubuntu 16.04 from the official download page from here.
Unable to install Google Chrome on Ubuntu 16.04. How to fix it?
One of the way to fix error in installing Google chrome in Ubuntu 16.04 is by fixing the broken package through terminal.
Download the Google Chrome linux variant.
Now open the terminal.Shortcut to open terminal is Ctrl+Alt+t.
Now go to the folder in which you have downloaded the Chrome. By default it is Downloads folder.
If you have saved the chrome installation file in downloads folder, then type “cd Downloads”. Hit Enter on keyboard.
Now type “ls”.
It will show all the files in the folder Downloads.
Copy the full file name of chrome installation file.
Now type “sudo dpkg -i google-chrome-stable_current_amd64.deb”. (Here google-chrome-stable_current_amd64.deb is the file name. You can change the file name according to the file name you have given.)
It will install the google chrome. If you find any error related to broken packages, then type the following.
sudo apt-get -f install.
Now once again execute “sudo dpkg -i google-chrome-stable_current_amd64.deb”.
It will be installed now.
How to move unity launcher to the bottom of the screen in Ubuntu 16.04?
You can move the Unity launcher to bottom of the screen and use as dock style launcher by following the steps given below.
Open the terminal(Ctrl+Alt+T).
Type “gsettings set com.canonical.Unity.Launcher launcher-position Bottom”
Unable to view Kannada fonts on Ubuntu 16.04? How to fix this?
If you are facing issue in rendering Kannada fonts in Ubuntu 16.04, follow the steps given below. It will also fix the Kannada font rendering issue in Chrome and Firefox browser as well.
Open Terminal
Type sudo apt-get install fonts-lohit-knda fonts-knda.
It will install all the required kannada fonts in Ubuntu 16.04. Now you will be able see the kannada fonts.
How to create automatically changing wallpaper in Ubuntu 16.04?
If you want to create a slideshow of your photos as your wallpaper, you can use “Shotwell” application. This is installed by default.
Open the Shotwell.
Import the photos which you want to add it to the slideshow.
Select the photos you want in the slideshow.
Now Go to File → Set as Desktop Slideshow or press Ctrl+B.
Adjust time settings for the duration for each photos to show up.
How to fix booting issue of Ubuntu 16.04 after installing windows 10 or Vice versa?
There is a simple tool called Boot repair which comes handy. It can repair frequent boot issues you may encounter in Ubuntu like when you can’t boot Ubuntu after installing Windows or another Linux distribution, or when you can’t boot Windows after installing Ubuntu, or when GRUB is not displayed anymore, some upgrade breaks GRUB, etc. I have written a detailed post on this. You can read more on this here How to Fix Windows Booting Issue after Installing Ubuntu Or Vice Versa.
How to take screenshot on Ubuntu 16.04?
Capturing print screen on Ubuntu 16.04 is very easy. You have a programme called screenshot. Open application. You have the option capture whole screen or certain portion of screen or only active screen. There is a option to take screenshot with time delay.