Author: Aniruddh

  • How to reduce photo file size in iPhone – Compress image size

    iPhones are known for its camera capabilities. It takes good photos and videos. With the latest iPhones such as iPhone 15 Pro, iPhone 14 Pro, image quality is great but at the same time, file size is also increased. To share it with someone, you may be thinking of reducing the file size. So in this post, let us explore how to reduce photo file size in iPhone without using any third party tools.

    How to reduce photo file size in iPhone and convert file formats of the images

    You can do it with the built in feature of the iOS. So to begin,

    • Go to Photos app. Select the photo you wish to reduce the file size or change the file format such as PNG, JPEG etc.
    • Tap Share and then select Save to Files.
    • Choose the destination folder and save it.
    • Now Go to Files apps and Navigate to the folder where you saved the photo.
    • Long press on the photo you want to reduce the file size.
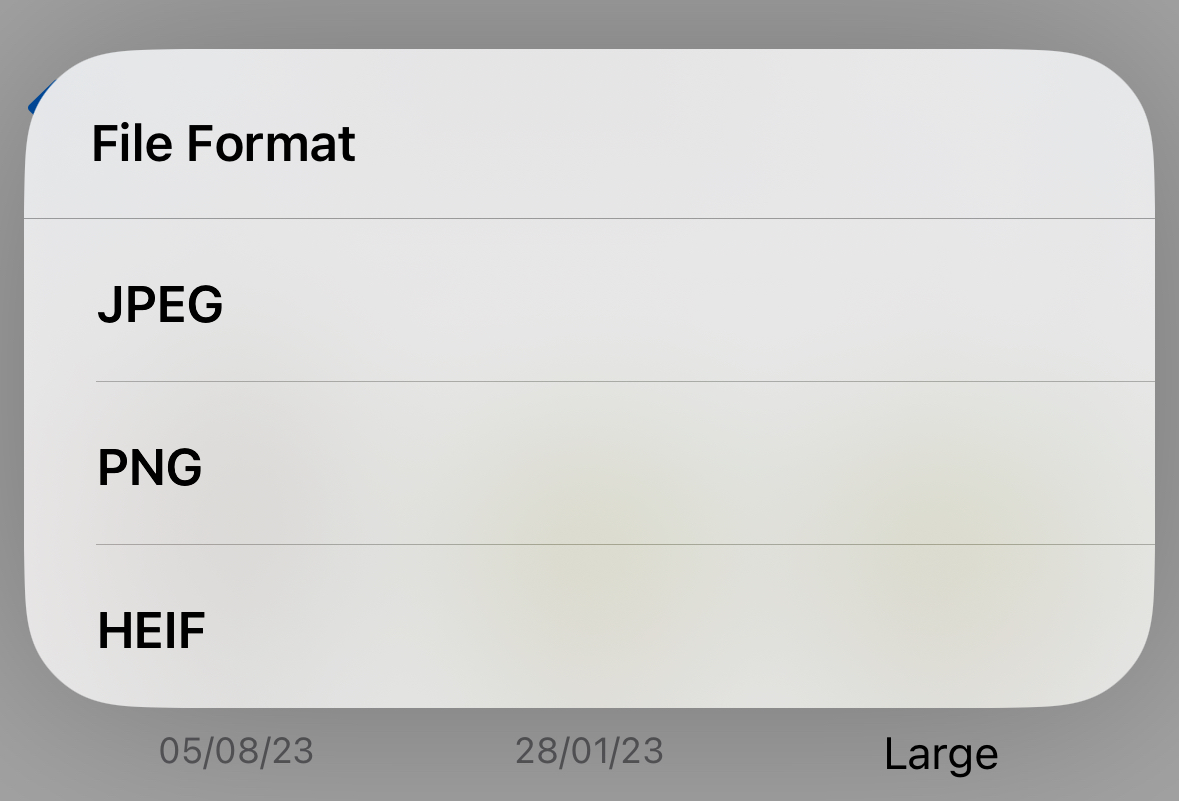
    • You will get a menu. Select Quick Actions. Next tap “Convert image“.
    Convert image in iPhone
    • Select the File Format of your choice. Now you can choose the image size between Small, medium, large or Original.
    How to reduce photo file size in iPhone
    • It will create copy of the image with compressed file size.
    • To create a compressed PDF from the image, long press on the compressed image. Select Quick Actions and then tap Create PDF.

    This way you can compress images on iPhone running on latest iOS. It is a good option if you want to create small sized pdf of scanned documents.

  • How to Turn Off iPhone 15 – 3 Ways

    If you wish to save battery or fix some annoying bug, easy solution is to turn off your iPhone 15. You can do this in three methods. So in this post let’s explore how to turn off iPhone 15.

    How to switch off iPhone 15

    Power off iPhone 15 using hardware button combination

    The first method to shutdown iPhone 15 is using the hardware buttons on your Phone. To use this method, press and hold down the Volume Up or Down button and the Side button at the same time.

    You will get a page which shows Slide to power off. Here Drag the power icon to the right to turn off your iPhone.

    Turn off iPhone 15 using the Settings menu

    If your iPhone physical buttons are not working or you prefer onscreen method to power off, you may find this method helpful.

    Start by navigating to Settings app on your iPhone and then Select General.

    Scroll down to the bottom and tap Shut Down.

    How to turn off iPhone 15

    Now drag the Power icon to the right.

    Switch off iPhone 15 using the Siri

    If you prefer to power off your phone without touching it, then Launch Siri by saying “Hey Siri”. Next say ” Shut down my iPhone”. You will get a confirmation prompt. Tap Power off.

    To turn on iPhone 15, hold the side button until you see Apple logo on the screen. You will phone will restart.

  • How to wipe cache partition on Samsung Galaxy Tab S9

    Clearing the cache partition may fix some of the issues on the Samsung Galaxy Tab S9, Galaxy Tab S9 Plus or Galaxy Tab S9 Ultra . Over the period of of time, system generated cache file increases and may impact the performance. It is considered to be safe as it will not remove any user data. So in this post, let us explore how to wipe cache partition on Samsung Galaxy Tab S9, Galaxy Tab S9 Plus and Galaxy Tab S9 Ultra.

    Though Clearing cache partition considered to be safe, it is recommended to have a backup of your phone before proceeding.

    How to wipe cache partition on Samsung Galaxy Tab S9 using android recovery mode

    To clear cache on Galaxy Tab S9 using this method, the first step is to get into Android recovery mode.

    Related post

    How to screenshot on Samsung Galaxy Tab S9

    Ways to turn off Samsung Galaxy Tab S9

    How to enter Android recovery mode on Galaxy Tab S9

    • First, Turn off your phone.
    • Once the phone is completely shut down, connect your tab with other Samsung phone or a computer using a USB cable.
    • Once you see the charging percentage on the screen, press and hold the Volume up and Side key together.
    • Samsung Logo followed by Samsung Galaxy appears on the screen. At this point, release the keys.
    • It will boot into the Android recovery mode.

    How to wipe cache partition on Samsung Galaxy Tab S9

    How to wipe cache partition on Samsung Galaxy Tab S9
    • Once you are in Android recovery mode on Galaxy Tab S9, you can navigate between the options using the Volume keys. So using the volume keys, navigate to Wipe Cache Partition.
    • Press the side key to select it.
    • Confirm your action by selecting Yes using the Volume key and then Side key.
    • At the bottom of the screen, you will get a message stating Cache Wipe complete.
    • Restart the phone by selecting Reboot system now and then Side key.
    • You can remove the USB cable now.
    • Phone will restart in the usual way.

    This way you can perform wipe cache partition on Samsung Galaxy Tab S9 using the Android recovery mode. If you have facing any issues, feel free to write them in the comment section below.

  • How to Disable Glance on Samsung Galaxy Phone

    If you have bought any Samsung Galaxy M series, Galaxy F Series or Galaxy A Series, you might have seen the ads on lock screen. These are called Glance on Samsung which is seen on Galaxy A34, Galaxy A54, Galaxy M34, Galaxy F34 etc. This consumes mobile data to download the auto changing wallpaper services. So, in this post, let us explore to how to disable Glance on Samsung Galaxy Phones.

    How to Disable Lock Screen Wallpaper services or Glance on Samsung Galaxy Phone

    To disable auto changing wallpapers or lock screen ads on Samsung Galaxy phones,

    • Go to Settings.
    • Scroll down and find Wallpaper and style. Once you get it, tap on it.
    • Now press Change wallpapers.
    • Next choose Wallpaper services.
    • Tap More button.
    • By default, Glance on Samsung will be selected. It means your phone lock screen will show ad-linked automatic changing wallpapers.
    • To remove lock screen wallpaper ads, Select None and toggle off the switch to disable Swipe left for the info page.
    • Save the settings by tapping Apply. This will disable glance in Samsung.

    This way, you can disable ads on Samsung Galaxy phone or lock screen ads.

  • Tecno Pova 5 Pro 5G backlight Settings Customisation

    Tecno Pova 5 Pro 5G is a budget Android smartphone with interesting feature. That is the Arc designed back lights. Best part is you can customise it as per your liking. So in this post, let us explore how to customise back light effects on Tecno Pova 5 Pro 5G.

    Tecno Pova 5 Pro 5G backlight Settings

    One of the key highlight of the Tecno Pova 5 Pro 5G is its RGB lights in the back cover. User can customise different effects for the notifications, music playback or games. So to customise RGB backlight effects on Tecno Pova 5 Pro 5G, follow the steps given below.

    • Open Settings.
    • Scroll down and find the option called Special Function. Go inside it.
    • Tap Back light effects.
    • Now you will get plethora of options to customise Backlight effects for incoming calls, Notifications, Start up and music.
    • To begin, make sure, Backlight Effect is turned on.
    • Tapping on the corresponding option will show you several different effects to choose from. You can see the preview by selecting the effects.
    • Once you’ve chosen your desired effect, tap the back button to return to the previous menu.
    • In the next option, you can enable or disable backlight effect for Games, Charging, Low battery etc.
    • To customize the backlight notification duration, simply tap on the ‘Light Effect duration’ option. You will then have the choice between the default setting and a custom one. By choosing the default option, the backlight notification will be active between 7am and 10pm. Outside of these hours, it will be automatically turned off. However, if you opt for the custom setting, you can set the start and end times as per your preference. This feature not only helps to conserve battery life, but it also prevents unnecessary disturbance due to the backlight notifications during nighttime.

    So this way you can customise the Tecno Pova 5 Pro 5G Backlight Settings. With RGB lighting on the back cover, it is a different experience for a budget phone like this.