Author: Aniruddh

  • OnePlus X Review-Pros and Cons

    OnePlus X is a midrange smartphone with stylish design, decent hardware at a affordable price. The price of OnePlus X in India starts from Rs.16,999. Let us have quick look into what we get on OnePlus X.

    OnePlus X is powered by 2.3GHz quad core Qualcomm Snapdragon 801 with 3GB RAM and an integrated Adreno 330 GPU. It has 16GB of internal storage and supports microSD card upto 128GB.  The device has support for dual sim. But it has hybrid dual sim tray. That means you need to choose between 2nd sim or microSD card. OnePlus X runs on Oxygen OS based on Android 5.1 Lollipop. The performance of the device is good in this price segment. It was able to play most of the games and apps without any issue. Call quality and signal strenght also decent. Sound volume through single speaker is bit weak.

    OnePlus X Dual sim
    OnePlus X

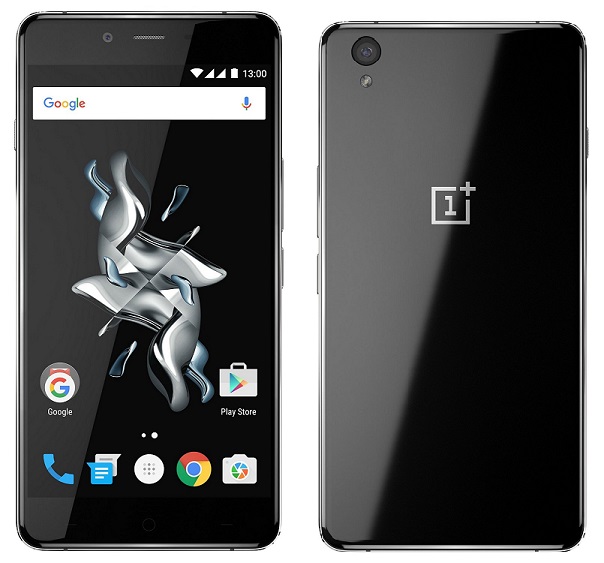
    OnePlus X sports 5 inch AMOLED display screens with full HD resolution and 441 ppi pixel density. The screen is protected by Corning Gorilla Glass 3.  As it is a AMOLED screen, it is sharp, detailed and vibrant. The viewing angles and sunlight legibility also good. There is low power ‘duochrome’ mode which wakes the phone to show time and notifications. This AMOLED technology works with proximity sensor. It is some thing hit or miss. OnePlus X comes with screen protector film. But it is low quality. You can use new protective screen gaurd.

    OnePlus X houses a 13-megapixel f/2.2 primary camera with single-tone flash, along with an 8-megapixel f/2.4 front camera. Both cameras are equipped with 1080p video recording capability. The rear camera can record 720p slow motion video at 120 fps. Camera performance just ok. It takes good images but misses out details. Front camera indoor shots came noisy. Outdoor performance is decent.

    OnePlus X has 2525mAh battery is not upto expectations. It drains faster if you have perform intensive task like gaming. Even browsing drains the battery faster. OnePlus X battery lasts for a day if you use the device conservatively. Otherwise you need to plug it into charger. The connectivity features of the device includes 4G, 3G, WiFi, USB tethering and WiFi hotspot.

    Let us summarize the OnePlus X review by splitting the merits and demerits.

    Advantages and Disadvantages of OnePlus X

    Pros of OnePlus X

    • Design and build quality.
    • Good Display screen.
    • Decent Performance.
    • microSD card support.
    • Competetive price.

    Cons of OnePlus X

    • Poor battrery life & No no quick charging support: Though it has 2525 mAh battery, when used with intensive task battery drains faster. Also battery is not user replaceable.
    • No dual-band Wi-Fi and NFC.
    • No 64-bit processor: Though  Snapdragon 801 capable SoC, it is bit outdated as of now.
    • Basic Camera app and average camera performance.
    • Availability: Invite only system is real pain to get this device.
    • 2nd sim or microSD card: The device has hybrid sim slot. That means, you can either use 2nd sim or microSD card. So if you want 2nd sim to be used you are restricted to only internal storage of around 10GB after system files.
    • Device is fingerprint magnet.

    OnePlus X Tips and FAQ

    Does OnePlus X supports USB OTG?

    Yes. The device supports USB OTG.

    How to take screenshot on OnePlus X?

    There are 2 methods through which you can take screenshot on OnePlus X. ‘

    1. Power+Volume down key: If you press and hold volume down+power key simultaneously, the screenshot will be taken.
    2.  Using Power menu: Press power button. You will get a menu. Choose the screenshot option. Tap on to it. The screenshot will be taken.

    How to use OnePlus X as Modem?

    You can use OnePlus X as a modem using USB tethering and Bluetooth tethering. If you have Wifi enabled device, you can make use of personal wifi hotspot. Do note that, for using USB tethering or WiFI hotspot, mobile data will be used. Hence charges may apply as per your service provider.

    What are the box content of OnePlus X?

    In the retail box which I have received contained Sim card ejector, silicone back covers, USB charger, screen guard (already pasted).

    If you have any other questions, feel free to ask in the comment section below.

  • How to Take Screenshot on iPhone 6s and iPhone 6s Plus

    iPhone 6s or iPhone 6s Plus are the two new smartphones launched recently with iOS 9 OS. Both these smartphones offer lot of great features such as 3D touch, 4K video recording etc. It is powered by latest 64 bit A9 chip. If you are looking for how to screen capture or print screen on your new iPhone, then here is the guide on how to take screenshot on iPhone 6s and iPhone 6s Plus.

    Take screenshot on iPhone 6S Plus

    How to take screenshot on iPhone 6s and iPhone 6s Plus

    For taking screenshot on iPhone 6s or iPhone 6s Plus, there are 2 different methods available.

    Method 1: Taking screenshot using Sleep/Wake or Power button and home buttons

    • Press and Hold Sleep/Wake or Power button which is placed in the right side of the device.
    •  Without releasing the Power button, press Home button.
    • The screen will flickr and screenshot will be saved.

    Method 2: Taking screenshot on iPhone 6s and iPhone 6s Plus using  Assistive Touch feature

    Take screenshot using iPhone Assistive touch

    Taking screenshot using the Assistive Touch feature is very easy. If you are already enabled Assistive touch on your iPhone, then skip the below steps and directly move to next section.

    How to enable Assistive touch on iPhone 6s and iPhone 6s Plus

    • Go to Settings->General->Accessibility.
    • Scroll down till you find Assistive touch.
    • Move the slider to right to enable it.

    Taking screenshot on iPhone using Assistive touch

    • Tap on to floating assistive touch menu on the screen.
    • Tap on to Device.
    • In this screen, select More.
    • Now tap on to Screenshot.
    • Screen will flash and screenshot will be saved.

    Where taken screenshots on iPhone gets Saved?

    You can access taken screenshot in  Photos-> Recently added photos.

    Taking screenshot using Sleep/Wake or Power button and home buttons works on all the previos iPhons such as iPhone 4, iPhone 4s, iPhone 5, iPhone 5s etc. But assitive touch method of taking screenshot works with only latest versions of iOS. For turning on Assistive touch another simple method is to Tell Siri “Turn on AssistiveTouch.” .

  • Samsung Galaxy J2 Review-Cons and Pros

    Samsung Galaxy J2 is a sub 10k Android dual sim smartphone with AMOLED display screen and 4G LTE connectivity. There are already plethora of smartphones in this price segment. How good is this smartphone comparing with them. Is this device value for money. We will see in this Samsung Galaxy J2 Review.

    Like we have seen in Galaxy J5 and Galaxy J7, Galaxy J2 too comes with AMOLED screen but in smaller screen size and lower resolution. It has 4.7 inch Super AMOLED Touchscreen with 540 x 960 pixels resolution and 234 ppi pixel density. The viewing angles are good. The colours reproduction and sunlight legibility too decent. In this price segment we have lot of options  with 720p HD resolution. Though the panel used in this device is of good quality, lower screen resolution is notceable if you watch it closely.

    Samsung Galaxy J2 is powered by  Exynos 3475 Quad core processor with 1GB RAM and Mali-T20 GPU. The day to day performance is decent and hardly there is a lag. But in multi tasking and gaming performance, this is not a match to the smartphones with 2GB RAM. The sound output is clear but loudness is bit on lower side. Call quality on this device is good. The device has 8GB internal storage and supports microSD card upto 128GB.

    Samsung Galaxy J2 sports 5MP primary camera with LED flash and 2MP front facing camera. Camera performance is just average considering the options we have in this price segment. The device is powered by 2000 mAh battery. The battery life on this dual sim galaxy smartphone is excellent.

    Recommended Reading:

    Lenovo Vibe P1m Review- 3900 mAh battery, 5 inch 720p HD Display at Rs.7,999.

    Let us summarize Samsung Galaxy J2 review by spliting into demerits and demerits.

    Advantages and Disadvantages of Samsung Galaxy J2

    Pros of Galaxy J2

    • AMOLED Display screen
    • Good battery life
    • Dual sim with 4G LTE connectivity(Both sim supports 4G LTE. Only 1 sim on 4G at a time).
    • Samsung company reputation and availability of service centers.
    • Decent performance.

    Cons of Galaxy J2

    • Lack of sensors: Samsung has included only Accelerometer, Proximity Sensor. The basic sensors like Ambient light sensor, compass etc are missing.
    • Average camera performance: The primary camera performance is just average comparing with competetors.
    •  No 720p HD display: It has only qHD display resolution.
    • Only 1GB of RAM.
    • Android 6.0 Update doubtful.

    Samsung Galaxy J2 Tips and FAQ

    How to take screenshot on Galaxy J2: For performing screen capture or print screen on Galaxy J2, press and hold home and power button simultaneously.

    How to use Samsung Galaxy J2 as Modem: You can use Galaxy J2 as modem through personal wifi hotspot and USB tethering features. The method is same as we have seen on Galaxy J5 and J7.

    How to download Galaxy J2 PC suite: Galaxy J2 is compatible with Samsung Kies 3.0. You can read more on this in my other article on how to download Samsung Galaxy PC suite.

    Samsung Galaxy J2 Specification

    • Dual Sim (GSM + LTE).
    • Android v5.1.1 (Lollipop) OS with Touchwiz UI.
    • 5 MP Primary Camera with LED flash.
    • 4.7 inch Super AMOLED Touchscreen with qHD resolution.
    • 1.3 GHz Cortex-A7 Exynos 3475 Quad Core Processor with 1GB of RAM.
    • 4G, 3G,Bluetooth, WiFi, microUSB.
    • 2000 mAH battery.
    • 8GB internal storage and microSD card support.
  • Asus ROG G551JK Review- Cons and Pros

    Asus ROG G551JK is a premium gaming laptop from Asus’s Republic of Gamers’ series. It has good configuration such as Core i7 processor, 8GB RAM and NVIDIA GeForce GTX 850M graphics processor. The price of Asus ROG G551JK in India is Rs.82,999.

    Asus G551JK Gaming Laptop

    The first thing you notice while open this laptop is its build quality and design. Like all previous ROG series gaming laptops, this also comes with Black and Red Colour combination. It has aluminum body with the top flap having a brush metal finish. This Asus gaming laptop has red-coloured backlighting chiclet keyboard which is very responsive and feels comfortable for typing. Trackpad on this device is large and works as expected. Overall interms of build quality and design,  Asus ROG G551JK feels very good.

    Asus G551JK Keyboard and Touchpad

    Asus ROG G551JK sports 15.6-inch full HD screen with matte finish which prevents background reflections from effecting the viewing experience. Though it has IPS display panel, it has few cons. The vertical viewing angles experience is not good. There is a bit of colour shifting happening when viewed from the sides of the screen. The black levels too not that great. Contrast on dark scenes or details in the shadow region were not clearly visible. Overall it is decent display panel, but it could have been better.

    Asus ROG G551JK being a gaming laptop features high end specifications. The laptop is powered by 4th Gen Intel Core i7-4710HQ processor which is a quad-core hyper-threaded processor clocked at 2.5GHz with the maximum Turbo frequency going upto 3.5GHz coupled with 8GB of RAM. Asus ROG G551JK has NVIDIA GeForce GTX 850M graphics processor which has 640 CUDA cores, the GTX 850M is clocked at 936MHz and DDR3 2GB RAM. This graphic processor is ranked at 4. This Asus gaming laptop has Trinity display technology which allows one to send 4K UHD content to a 4K display via its mini-DisplayPort and HDMI port. Most of the games plays without any issues. But very high end games, needs to play in medium settings.

    Asus ROG G551JK battery  is decent considering it is a gaming laptop. While playing high end games, I was able to get around 1 and half hour to 2 hours battery backup. But when streaming videos,simple document editing and surfing web, battery lasted more than 3 hours. Other features of this Asus gaming laptop includes Blueray reader, three USB 3.0 ports, a LAN port and a 3.5mm audio jack. Our test unit box containes a mouse which is of good quality.

    Let us summarize Asus G551JK review with merits and demerits of this laptop. This will give you an idea on this laptop performance.

    Advantages and Disadvantages of Asus G551JK

    Pros of Asus G551JK

    • Good build quality: Aluminium body with the top flap having a brush metal finish,  black and red colour tone, gives good astetic to the device.  The screen lid which is made up of metal which gives sturdy feel.
    • Good audio output: The output is clear and loud.
    • Decent Battery life: Considering it is a gaming laptop, battery life is decent.
    • Responsive Touchpad and Keyboard: Backlite Chicklet keyboard and touchpad are good.
    • Value for money: G551JK is not a ultimate gaming laptop. We have much better laptops but their price crosses over 1 lakh. Considering the price, performance is good.

    Cons of Asus G551JK

    • Display could have been great: The viewing angles and deep black levels are just average.
    • Fingerprint magnet: The backside of the display and handrest places attracts smudges. Needs to wipe oftenly to keep it clean.

    Asus G551JK is priced in India at Rs.82,999. At this price, you get a full hd screen, Core i7 processor, 8GB RAM, 1TB hard disc, NVIDIA GeForce GTX 850M graphics processor and Blueray reader. The retail unit contains audio headphone and gaming mouse. It has its own few flaws which are mentioned on the Asus G551JK cons section.  As said before, for the price, it justifies with performance and great looks. I have tested the unit with Windows 8.1. However, you can update Asus G551JK to Windows 10.

  • How to use Samsung Galaxy J5 and J7 as Modem

    Samsung Galaxy J5 and Galaxy J7 are two mid range Android smartphone which offers good features in affordable price.  The AMOLED screen is the additional attraction of these smartphones. The Android version and UI are identical. In this post, we will learn to use Galaxy J5 and Galaxy J7 as modem through personal WiFi hotspot and USB tethering.

    WiFi Hotspot and USB tethering are two popular methods to share internet from smartphone to PC or other WiFi enabled devices. So in this post, let us explore the two different methods to share internet from Galaxy J5 and Galaxy J7 to other devices.

    Other Related Tips:

    How to take screenshot on Samsung Galaxy J5, J7 and J2.

    How to download PC suite for Galaxy J5, J7, J2

    How to use Samsung Galaxy J5 and  Galaxy J7  as Modem

    For using Samsung Galaxy J5 and  Galaxy J7 as modem to connect to internet from PC, Laptop or iPad, there are 3 different methods. The methods are Personal WiFi hotspot, USB tethering and Bluetooth tethering. You can use any of these methods according to your requirement. For using this Samsung Galaxy smartphone as modem, you need to have a data plan for tethering. The charges might apply as per your cellular network provider.

    How to use Samsung Galaxy J5 and  Galaxy J7 personal Wi-Fi Hotspot

    Samsung Galaxy personal Wi-Fi hotspot is the method through you can share your mobile data to other WiFi enabled devices through mobile hotspot.

    1. First enable the Mobile data.
    2. Now go to Apps->Settings.
    3. Tap on to Tethering and Mobile hotspot.
    4. Now Select Mobile Hotspot.
    5. Here you can enable the WiFi hotspot by moving the slider to right.
    6. You can access your mobile WiFi hotspot from any other wifi enabled devices using the SSID and password you have provided while configuring the Mobile Hotspot.

    How to configure Mobile Hotspot/WiFi hotspot in Galaxy J5 and  Galaxy J7

    • Follow the steps till 6 and then tap on to Menu Button(|)
    WiFI hotspot password reset
    • Tap configure hotspot.
    • In this page, you an enter or edit the network SSID, password  and security type.
    • Once down tap on to Save.

    Video Guide on how to use Galaxy J5 & Galaxy J7 as Wi-Fi Hotspot

    Video guide on how to use Samsung Galaxy J5 and Galaxy J7 as modem

    How to use USB tethering on Samsung Galaxy J5 and Galaxy J7

    • Connect your your device to PC through USB cable.
    • Install the required drivers. If any difficulty in installing the USB the driver for Galaxy J5 or J7, download and install Samsung Kies.
    • Follow the steps 1 to step 4 mentioned above.
    • Enable the USB tethering by moving the the slider right.
    • Your USB connected device will start getting the internet.

    How to use Bluetooth tethering on  Samsung Galaxy J5 and Galaxy J7

    • First you need to pair your smartphone with device which you want to connect to internet.
    • Then follow the steps 1 to 4.
    • Now enable the Bluetooth Tethering.

    These are the different ways of  accessing net from pc through Samsung Galaxy J5, Galaxy J7, Galaxy J2.

    Note:

    Using  Samsung Galaxy J5 and Galaxy J7 as WiFi hotspot, will drain your battery faster. So use this feature wisely.