Tag: How to take screenshot

  • How to Take Screenshot on Yu Yunique

    Yu Yunique is the most budget 4G dual sim Android smartphone with HD screen resolution. It has got a decent spec sheet and very attractive price tag. There is one surpraising fact in this phone. This is runs on Android 5.1.1 Lollipop instead of Cynogen OS. So in this post we will learn on how to take screenshot on Yu Yunique.

    Yu Yunique 4G Android

    How to take screenshot on Yu Yunique

    Previous smartphones from Yu Televenture  such as Yu Yureka Plus or Yu Yuphoria had multiple option to capture the screen as those were running on Cynogen OS. But to do print screen on Yu Yunique we have only the one option that is through hardware buttons. So here we go.

    Recommended reading:

    How to take screenshot on Yu Yureka Plus

    • Go to the screen on which you want to take screenshot on Yu Yunique.
    • Now press and hold power button and volume down key which are placed in the right side of the device simultaneously for few seconds.
    • You will hear a shutter sound and screen flicker which gives a confirmation that, the screenshot is taken.

    Where the taken screenshot on Yu Yunique is saved?

    The taken screenshot can be accessed via gallery.

    Yu Yunique is powered by 64 bit Snapdragon 410 chipset with 1GB of RAM and 8GB of internal storage. It comes with 4.7 inch 720p HD display screen. Other key specification of this Yu Yunique includes, 8MP primary camera, 2MP front facing camera. The Yu Yunique price in India is Rs.4999. The device runs on Android 5.1.1 and not on Cynogen OS. The budget Dual sim Android smartphone supports 4G LTE in India. If you want to buy this smartphone, you can purchase from Snapdeal.com.

    Hope this guide on how to take screenshot on Yu Yunique is helpful. If you are facing any issues, please share it in the comment section below. I will making a video guide on how to take screenshot on Yu Yunique shortlly.

  • How to take screenshot on Yu Yureka Plus

    Yu Yureka Plus is one of the feature rich smartphone. It has full HD screen, 4G LTE support, Snapdragon 615 Soc with 2GB of RAM. The device runs custom ROM Cyanogen Mod based on Android Lollipop. I have already made a review on this device. You can refer to that post. Yu Yureka Plus price in India is Rs.8999 after the price cut. For this price, this Dual sim Android smartphone considered to be one of the best value for money device. In this post, we will learn how to do print screen on Yu Yureka Plus..

    Read:

    Yu Yureka Plus Review

    How to take screenshot on Yu Yureka Plus

    The screen capture method on Yu Yureka Plus is very similar to its predecessor Yu Yureka. There are 2 different methods for Yu Yureka Plus screen capture. We will learn one by One.

    1. Default Android Method(Volume Down+Power Key Method): For using this method, go to the screen on which you want to take the screenshot. Now press and hold Volume down key and power button simultaneously. The screen will flicker. The active screen will be captured. The captured screenshot will be saved in Gallery-> Screenshot folder.

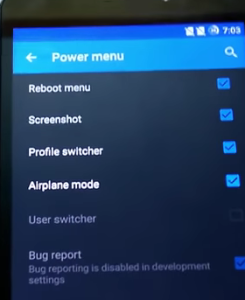
    2. Using the Power Menu: There is one more method to do print screen on Yu Yureka Plus. You can choose this  method, if you find the above method difficult.

    Yu yureka Plus Printscreen

    First you need to enable screenshot option in Power menu. For doing that, follow the method mentioned below.

    • Go to settings.
    • Go to buttons->Power Menu.
    • Now enable screenshot option in power menu by checking the option in front of screenshot.

    Now for taking screenshot follow the steps given below.

    • Go to the screen on which you want to take screenshot.
    • Now press the power button.
    • You will get a power menu options.
    • In the options you will find Screenshot option.
    • Tap on to it. The screenshot will be taken.
    • Taken screenshot on Yu Yureka Plus will be saved in Gallery-> Screenshot folder.

    Hope this guide on how to take screenshot on Yu Yureka Plus is useful. If you find any difficulties in following this or if you are getting any error message, feel free to share in the comment section below. Your feedbacks are appreciated.

  • How to Take screenshot on Lenovo K3 Note

    Lenovo K3 Note is one of the best value for money smartphone. It has decent specifications at very attractive price. Taking screenshot on Lenovo K3 Note is very easy. There are 2 ways through which you can perform print screen. Taking print screen on Lenovo K3 Note is useful if you want share your specific page or error message or even high score on specific game. So let us learn how to take screenshot on K3 Note.

    Read:

    Lenovo K3 Note Review

    How to download and Install Lenovo PC Suite

    How to Take screenshot on Lenovo K3 Note

    As I mentioned in the starting, there are 2 methods through which you can take screenshot on K3 Note.

    Method 1: The default Android Method

    This is most common way of taking screenshot. You need to press and hold volume down and Power button simultaneously. The screen will flicker and screenshot will be saved in Gallery folder.

    Method 2: Lenovo Vibe UI method

    • First you need to go the screen on which you want to take screenshot on Lenovo K3 Note.
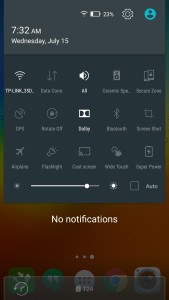
    • Go to Quick settings option by pulling the screen from top to down.

    How to Take screenshot on Lenovo Smartphones

    • You will have icon called screen shot. Tap on to it.
    • Here you have two options.
      • You select the area of the screen on which you what to capture the screen on K3 Note. You can do that by selecting the capture area.
      • If you want the whole screen to be captured then, tap on to Full screen.
      • If you want to share the screenshot with your friends, then tap on to share. You will get options to choose from the list through which you want to share the screenshot.

    Lenovo K3 Note runs on Android 5.0 Lollipop with Vibe UI. Vibe UI provides many customisation which are useful for many users. Option to select the area of a screen to take screenshot on Lenovo K3 Note is one of them. I have a made a video on how to take screenshot on Lenovo K Note.

    Video Guide on How to take screenshot on Lenovo K3 Note

  • How to take screenshot on Asus Zenfone 2

    Capturing screenshot on Asus Zenfone 2 series smartphones are very easy. Asus has provided three different ways to snap screenshot. Each methods are very easy and anyone can perform in few seconds.

    Below mentioned ways to take screenshot works on most of the Asus Zenfones such as Zenfone 5, Zenfone 6, Zenfone 2, Zenfone Laser, Zenfone Zoom, Zenfone Max, Zenfone Delux to name  few.  It will be useful if you would like to share your highest score in a game with your friend or save a online payment reciept or even sharing error message. Apart from this, there many other situations, taking snapshot of screen comes in handy.

    Also read:

    How to use Asus Zenfone 2 as Modem through personal hotspot, USB tethering and Bluetooth Tethering

    How to take screenshot on Asus Zenfone 2

    Asus Zenfone 2 has various variants. The different variants are based on the size of RAM and internal storage. There is also two variants based on screen resolution. One is 720 and rest 1080p.  All these variants runs on Android 5.0 Lollipop and ZenUI. So taking screenshot on Zenfone 2 all variants remains same.

    To take screenshot on Asus Zenfone 2 there are 3 methods available. They are: 

    1. Default Android Method
    2. Using the recent apps key
    3. Screenshot icon to the quick settings menu

    Method 1: Default Android Method

    For taking screenshot using this method, go to the screen on which you want to take the screenshot. The press and hold volume down key and power button simultaneously. The screenshot will be taken and it will be saved in photos folder.

    Method 2: Using the recent apps key

    This method taking screenshot is much easier than the previous method. To take screenshot on Zenfone 2 using this method, follow the steps given below.

    • Go to settings-> ASUS customised settings
    • Tap on to ‘Recent apps key’.
    • Choose the ‘Tap and hold to capture screen’.
    • Now go to the any screen on which you want to screenshot, tap and hold recent apps key(right side key of home button) for a second. The screenshot will be taken.
    • Captured print screen will be saved in photos or Gallery.

    Method 3: By adding screenshot icon to the quick settings menu.

    Zenfone 2 Print screen

    • Open the quick settings menu.
    • Tap on to the edit quick settings icon.
    • Under ‘select tools to show on quick settings panel’, select screenshot. Do remember, you can only select 4 tools. So, for enabling screenshot, you need disable any other other 4 tools which are already selected.
    • Tap on to save.
    • Now go the screen on which you want to take screenshot, and access quick settings panel and tap on to screenshot icon. The screenshot will be taken.
    • The captured print screen of Zenfone 2 will be saved in Gallery or photos.

    Video Guide on Taking screenshot on Asus Zenfone 2

  • How to take screenshot on Lenovo A6000

    Lenovo A6000 is a budget Dual sim Android smartphone with 4G capability. The device runs on Android 4.4 Kitkat out of the box with Vibe UI. Taking screenshot on Lenovo A6000 is very easy. There are two methods through which you can take screenshot. Here are the two methods to take screenshot on Lenovo A6000 4G Android smartphone.

    Useful Tips and Tricks Posts on Lenovo A6000 and A6000 Plus:

    How to use Lenovo A6000 as Modem: How to guide on using features like perforsonal wifi hotspot and USB tethering.

    How to download Lenovo A6000 PC suite: Tips to download and install USB driver and PC suite

    How to take screenshot on Lenovo A6000

    As mentioned before, there are methods. First one is the default Android method and another one is Lenovo Vibe UI exclusive method.

    Android Default method of taking screenshot on Lenovo A6000.

    Like any other Android smartphone, you need to press and hold Volume down and power button simultaneously to take screenshot.

    Vibe UI way of taking screenshot on Lenovo A6000

    • First go to the screen on which you want to take the screenshot.
    • Next go to quick notification area settings by swiping the screen from top to down using two finger.

    Print screen on Lenovo A6000

    • The quick settings has the screenshot icon.
    • Tap on to it to take the screenshot.

    Where the taken screenshot gets saved?

    The taken screenshot on Lenovo A6000 will be saved on Gallery folder.

    Video on How to take screenshot on Lenovo A6000