Tag: USB tethering

  • Motorola Moto X Play Screenshot and Tethering Guide

    Motorola Moto X Play comes with decent specifications at affordable price. Running on Android 5.1  it offers pure Android experience. This device will be getting the Android 6.0 update very soon. In this post we will learn how to take screenshot on Motorola Moto X Play and how to use Moto X Play as modem.

    Recommended Reading:

    Motorola Moto X Play Review- Pros and Cons

    Moto X Play Dual

    How to take screenshot on Motorola Moto X Play

    Performing print screen or screen capture on Moto X Play is very easy and same as other Android smartphones.

    •  First go to the screen on which you want to take screenshot.
    • Press and Hold Volume down and Power Key simultaneously.
    • Screen will flickr and shutter sound will heard which confirms screenshot is taken.
    • The take screenshot will be saved in Gallery->Screenshot folder.

    How to use Motorola Moto X Play as Modem

    We can use Motorola Moto X Play as modem through personal wifi hotspot, USB tethering and Bluetooth tethering features. All these ways uses Mobile data and hence charges may apply as per service provider. Enable the mobile data/Cellular data and then follow the steps given below.

    How to use Moto X Play as personal WiFi hotspot

    • Go to settings->More…->Tethering & mobile hotspot.
    • Enable the Mobile Wi-Fi hotspot.
    • For customizing/entering new password and SSID, tap on to Set up Wi-Fi hotspot.
    • You can enter your desired password and SSID id here.
    • If you forgot your hotspot password, then this page itself, tap on to Show password. The password will be shown.

    How to use Moto X Play as Modem through USB tethering

    • First connect your Moto X play to your Laptop/Desktop through USB cable.
    • It needs drivers to be installed. If you are connecting for the first time, Windows on your system will install the required drivers.
    • Now Go to settings->More…->Tethering & mobile hotspot.
    • Enable the USB tethering.

    How to use Moto X Play as Modem through Bluetooth Tethering

    • First you need to pair your Moto X Play with your Bluetooth enabled Laptop/Desktop.
    • Once paired, go to settings->More…->Tethering & mobile hotspot.
    • Enable the Bluetooth tethering.
     The above method using Moto X play through USB tethering works well on Windows 8.1 or later systems. However, by default Android doesnot support tethering for Apple’s OS X platform.  So if you want to enable USB tethering with Apple Mac systems you need to thirty party application. There may be many USB Tethering driver for Mac. The one which I have used and worked well is HoRNDIS which is developed by  Joshua Wise. You can download USB tethering driver for Mac from the link here.
  • How to use Samsung Galaxy J5 and J7 as Modem

    Samsung Galaxy J5 and Galaxy J7 are two mid range Android smartphone which offers good features in affordable price.  The AMOLED screen is the additional attraction of these smartphones. The Android version and UI are identical. In this post, we will learn to use Galaxy J5 and Galaxy J7 as modem through personal WiFi hotspot and USB tethering.

    WiFi Hotspot and USB tethering are two popular methods to share internet from smartphone to PC or other WiFi enabled devices. So in this post, let us explore the two different methods to share internet from Galaxy J5 and Galaxy J7 to other devices.

    Other Related Tips:

    How to take screenshot on Samsung Galaxy J5, J7 and J2.

    How to download PC suite for Galaxy J5, J7, J2

    How to use Samsung Galaxy J5 and  Galaxy J7  as Modem

    For using Samsung Galaxy J5 and  Galaxy J7 as modem to connect to internet from PC, Laptop or iPad, there are 3 different methods. The methods are Personal WiFi hotspot, USB tethering and Bluetooth tethering. You can use any of these methods according to your requirement. For using this Samsung Galaxy smartphone as modem, you need to have a data plan for tethering. The charges might apply as per your cellular network provider.

    How to use Samsung Galaxy J5 and  Galaxy J7 personal Wi-Fi Hotspot

    Samsung Galaxy personal Wi-Fi hotspot is the method through you can share your mobile data to other WiFi enabled devices through mobile hotspot.

    1. First enable the Mobile data.
    2. Now go to Apps->Settings.
    3. Tap on to Tethering and Mobile hotspot.
    4. Now Select Mobile Hotspot.
    5. Here you can enable the WiFi hotspot by moving the slider to right.
    6. You can access your mobile WiFi hotspot from any other wifi enabled devices using the SSID and password you have provided while configuring the Mobile Hotspot.

    How to configure Mobile Hotspot/WiFi hotspot in Galaxy J5 and  Galaxy J7

    • Follow the steps till 6 and then tap on to Menu Button(|)
    WiFI hotspot password reset
    • Tap configure hotspot.
    • In this page, you an enter or edit the network SSID, password  and security type.
    • Once down tap on to Save.

    Video Guide on how to use Galaxy J5 & Galaxy J7 as Wi-Fi Hotspot

    Video guide on how to use Samsung Galaxy J5 and Galaxy J7 as modem

    How to use USB tethering on Samsung Galaxy J5 and Galaxy J7

    • Connect your your device to PC through USB cable.
    • Install the required drivers. If any difficulty in installing the USB the driver for Galaxy J5 or J7, download and install Samsung Kies.
    • Follow the steps 1 to step 4 mentioned above.
    • Enable the USB tethering by moving the the slider right.
    • Your USB connected device will start getting the internet.

    How to use Bluetooth tethering on  Samsung Galaxy J5 and Galaxy J7

    • First you need to pair your smartphone with device which you want to connect to internet.
    • Then follow the steps 1 to 4.
    • Now enable the Bluetooth Tethering.

    These are the different ways of  accessing net from pc through Samsung Galaxy J5, Galaxy J7, Galaxy J2.

    Note:

    Using  Samsung Galaxy J5 and Galaxy J7 as WiFi hotspot, will drain your battery faster. So use this feature wisely.

  • How to Use Asus Zenfone 2 As modem to Connect to Internet from PC

    Asus Zenfone 2 is one of the popular android smartphone. Good performance, Good camera, ZenUI with great customizability features and affordable price attracts people to buy this smartphone. Asus has launched different variants under  Zenfone 2 series such as  Zenfone Laser, Zenfone Selfie, Zenfone 2 Deluxe etc. These smartphones support fast 4G LTE connectivity. So is any way to share Zenfone mobile data with PC, Laptop, iPad, tablet?. Yes. the current Android smartphones does allow this feature by default. So here is the guide on how to use Asus Zenfone 2 as modem to share mobile internet to PC, Laptop, iPad, tablet etc.

    Recommended reading:

    How to take screenshot on Asus Zenfone 2

    How to Use Asus Zenfone 2 As modem to Connect to Internet from PC

    For using Asus Zenfone 2 as modem, based on the requirement, there are three different methods are available. WiFi hotspot method, USB tethering and Bluetooth Tethering. Do note that, using any of this method will consume your mobile data. So make sure you have good mobile data plan enabled from your mobile network provider. The data charges applies as per your network provider. Let’s start one by one methods. For using all this method, first enable mobile data and then follow the steps.

    Asus Zenfone 2 As WiFi Hotspot to Connect to Internet from PC, Laptop, iPad, tablet with WiFi reception capability

    This is most popular and very useful method of sharing mobile data with other WiFi enabled devices. To use Asus Zenfone 2 as WiFi Hotspot, follow the steps given below.

    • Go to “Settings”-> “More”-> ” Tethering and Wifi hotspot “-> ” Set up Wi-Fi hotspot “.
    • Enable WiFi hotspot by tap on the checkbox. Your Zenfone 2 will start sharting the mobile data via WiFi.
    • To customise the WiFi hotspot settings, go to ” Settings ” -> ” More ” -> ” Tethering and Wifi hotspot ” -> ” Set up Wi-Fi hotspot “.
    • In this page you can name your WiFi network SSID, password and Security type. Once done, tap on to “Save”.
    • Now you can access your Zenfone 2 WiFi hotspot from any WiFi enabled devices by entering the SSID and password you have chosen.

    Below is the video Guide on how to use Zenfone as WiFi hotspot.

    How to Use Asus Zenfone 2 as modem through USB Tethering

    Asus Zenfone 2 USB Tethering is the method used to share mobile to data to PC through USB.

    • First connect your Zenfone 2 to PC via USB cable. You might need Asus Zenfone PC suite for install drivers.
    • then Go to “Settings”-> “More”-> ” Tethering and Wifi hotspot “.
    • Enable “USB tethering”.
    • Your Zenfone 2 will start sharing the mobile data to your PC.

    How to Asus Zenfone 2 as modem through Bluetooth Tethering

    Asus Zenfone 2 Bluetooth Tethering is the method used to share mobile internet to PC through Bluetooth. For using this method, you need to configure your PC as well.

    • Enable Bluetooth on your Zenfone 2.
    • Now go to “Settings”-> “More”-> ” Tethering and Wifi hotspot “.
    • Enable “Bluetooth Tethering”.
    • Make your Zenfone visible visible to all nearby Bluetooth devices.

    Now you need to pair it with your laptop to connect to internet using Zenfone 2 Mobile data. This is a one time activity on your laptop.

    • On your laptop, go to Control Panel-> Devices and Printers.
    • Click on Add a device. It will show all available devices.
    • Select Zenfone and click “Next”.
    • Make sure the pairing codes are consistent in ZenFone and Laptop then click on Pair.
    • You will get a confirmation that, Zenfone is successfully added to your laptop.
    • Now once again go to Control Panel-> Devices and Printers.
    • Right click the ZenFone icon.
    • Select “Connect using”.
    • Select “Access point”.
    • Now Bluetooth Tethering is enabled.
  • How to Install Lenovo PC Suite and USB Driver

    Lenovo smartphones are getting more and more popularity with launch of Lenovo A6000, Lenovo a6000 Plus, Lenovo 7000, Lenovo K3 Note. All these smartphone are highly competitively priced and offers great specs. For connecting the Lenovo smartphone to PC through USB, we need USB drivers and PC suite. In this post, we will learn how to download and install Lenovo PC Suite. Lenovo USB drivers and Mobile Assistant PC are useful in syncing and accessing your smartphone from the comfort of PC.

    Other useful tips and tricks for Lenovo A6000 and Lenovo A6000 Plus:

    How to Take screenshot on Lenovo Smartphone: Guide on different methods available to perform print screen on Lenovo A6000.

    How to use Lenovo A6000 as personal WiFi Hotspot: How to guide on USB tethering and WiFi hostpot on Lenovo A6000,

    How to download Lenovo PC Suite and USB Drivers

    Lenovo does provide Lenovo Mobile Assistant and USB drivers in the device itself in the most of the smartphones such as Lenovo A6000, Lenovo a6000 Plus, Lenovo 7000, Lenovo K3 Note. For installing the USB drivers and Lenovo PC Suite, follow the steps given below.

    • First connect your connect Lenovo smartphone to PC through USB cable.
    • PC will open folder of your phone and a new drive will also get open.
    • In the folder, you will find USB driver and Lenovo Mobile Assistant.
    • First install the USB driver and then install the Lenovo Mobile Assistant.
    • Disconnect your smartphone from PC and launch Lenovo Mobile Assistant.
    • Now connect your smartphone to PC.
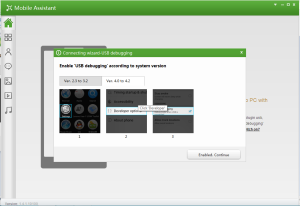
    • Enable USB Debugging.

    Lenovo PC Suite
    Lenovo Mobile Assistant

    • Now you will be able to access your smartphone from your PC.
    • You can view and send messages, see your contacts, manage audio and video files etc using the Lenovo PC Suite Mobile Assistant.

    How to download the Lenovo Mobile Assistant from Lenovo Official page

    As I mentioned above, you will be able to get the USB drivers and Lenovo PC suite from the smartphone itself. If any chance, it is not available, you can download it from the Lenovo downloads page or you can directly access from the link here.

    You can also install Lenovo Smart Assistant which is a software which is useful for easy and convenient way to upgrade your phone/tablet system through PC. This is compatible with Windows 7 (32-bit),Windows 7 (64-bit), Windows 8.1 (32-bit), Windows 8.1 (64-bit),Windows 8 (32-bit),Windows 8 (64-bit),Windows XP (32-bit),Windows XP (64-bit). The size of download is 5.7MB. For download and install Lenovo Smart Assistant Click on the link here.

  • How to use Lenovo A6000 as Modem

    Lenovo A6000 is one the most affordable 4G Dual sim Android smartphone in India. The good internal hardware coupled with decent build quality and competetive price is the key attraction of this smartphone. In this tutorial, we will see, how to use Lenovo A6000 as modem through WiFi hotspot and USB tethering.

    Read:

    Take screenshot on Lenovo A6000

    Lenovo A6000 Review

    How to download Lenovo A6000 PC Suite

    How to use Lenovo A6000 as WiFi Hotspot

    As I mentioned earlier, Lenovo A6000 supports 4G speeds. So even if you are outside, you can get the broadband speed on your smartphone. It is worth to use Lenovo A6000 as WiFi hotspot to connect to internet from your laptop or PC. Do remember that, using WiFi hotspot will incur charges as per your data plan also it will drain your device battery faster. Let us have a look into how to use Lenovo A6000 as WiFi hotspot.

    1. Enable the mobile data.
    2. Now go to settings->More…
    3. Tap on to Tethering & hotspot.
    4. Now enable the WLAN hotspot moving the slider to right.
    5. It will enable your Lenovo A6000 as WiFi hotspot.

    How to customise Lenovo A6000 WiFi hotspot Settings.

    If you want to customise the settings such as SSID, password and security type, follow the step given below. Even if you wanto see the Lenovo A6000 hotspot password or just want to change or reset Wi-Fi hotspot password of Lenovo A6000 and A6000 Plus, follow the step given below.

    • Tap on to WLAN hotspot
    • Now go to Set up WLAN hotspot.
    • You enter or edit the SSID, password and security type in this page.
    • Once you are done, tap Save.

    How to use Lenovo A6000 as modem through USB tethering

    1. Follow the same steps mentioned above till the step 3.
    2. Now connect your device to PC or laptop using the USB cable.
    3. Now enable the USB tethering.
    4. Now mobile data will be shared to your PC.

    Video Guide on How to use Lenovo A6000 as WiFi Hotspot